DuoCircle is a cloud-based email security provider offering solutions like Advanced Threat Defense against phishing and malware, Email Backup MX for delivery continuity, Outbound SMTP for reliable email delivery, and tools for email authentication (SPF/DKIM/DMARC). Their services aim to enhance email security, improve deliverability, and provide backup mechanisms.
The SPF record specifies which mail servers are permitted to send email on behalf of your domain. Conversely, the DKIM record is a unique DNS TXT entry that contains the public key used by receiving mail servers to validate a message’s signature. Both these email authentication techniques serve to confirm to ISPs and email services that the senders are genuinely authorized to dispatch emails from a specific domain, ensuring the legitimacy of the email’s origin.
Process of SPF configuration
- Sign in to the Client Administration Portal.
- Click on the Outbound SMTP Service you intend to verify.
- Click on the “Add and verify…” box below to begin, or select the “Sender Domain and DKIM” option from the Configuration menu on the left side.
4. Select “Add Domain”, input the domain name(s) from which you’ll be sending emails, and then click “Save.”
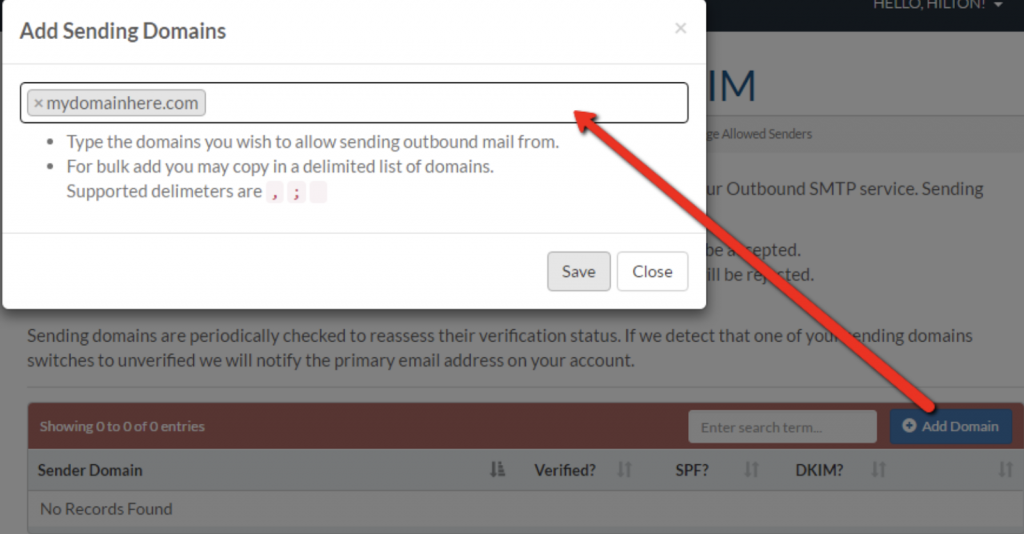
5. To verify SPF and DKIM for the designated domain, either click on the row to access the editing page or select the pencil icon next to the “x” button.

6. Within this section, you’ll encounter headings for SPF and DKIM. Each row will have informative labels indicating the respective status.
7. Proceed to add the following TXT record to your domain using your DNS provider’s interface: v=spf1 include:outbound.mailhop.org ~all
Screenshot below will show you an example of the SPF record. We’ll be using CloudFlare for this example.
Important Note: Each domain must have only one SPF TXT Record. If you have multiple SPF Records, SPF will return a PermError.
If you are using multiple IPs, ESPs, Third-Party services for your various email strategies, you should include them in a single SPF Record.
E.g v=spf1 ip4:18.57.156.221 include:outbound.mailhop.org include:thirdpartyservice.com ~all
8. After adding the record, click the “Retry SPF Check” button to proceed. Verification might take several hours based on your DNS provider’s settings. If it doesn’t confirm immediately, consider revisiting after an hour to retry.
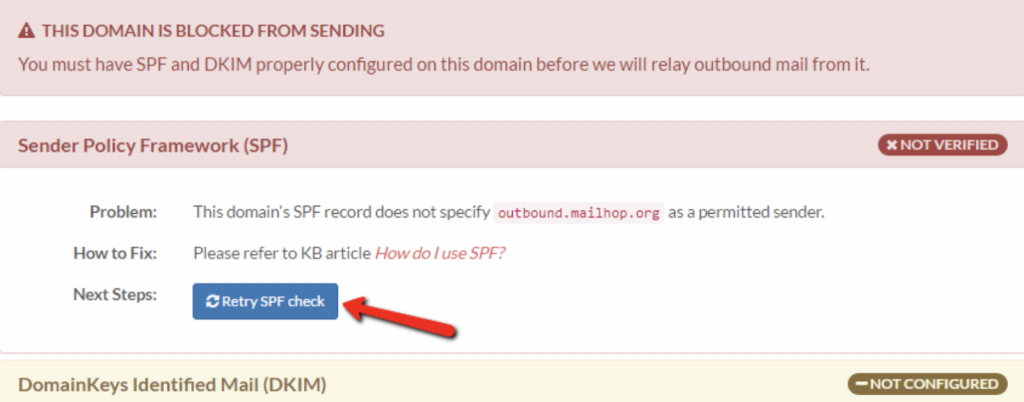
9. Upon successful validation, you’ll see a label colored green that reads “Verified.”
Process of DKIM configuration
- Click on “Not Configured” to access the verification box for the DKIM record, and then select “Generate a DKIM key.”
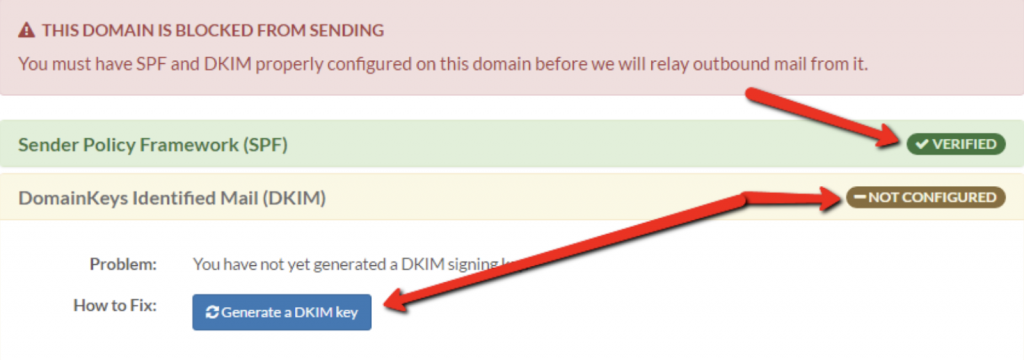
2. You’ll be presented with the DKIM key values: the “Record Name” and “Record Text.” Use these values to establish a new TXT record for your domain through your domain’s DNS provider.
The screenshot below will show you an example of the DKIM record. We’ll be using CloudFlare for this example.

After setting up the record, click on the “Retry DKIM Check” button within the DuoCircle Portal to verify that the record has been correctly updated.
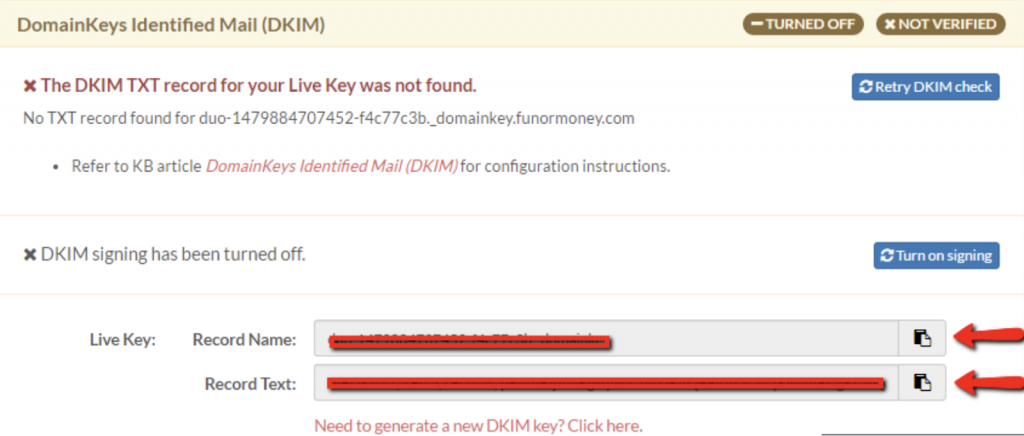
3. The DKIM section should now display the “Verified” labels in green.
4. To commence with DKIM, activate the “Turn On Signing” option. While it’s not mandatory to enable DKIM signing post-verification, it’s recommended to enhance email deliverability.
5. On the configuration page, you should now observe the “Verified” label for both SPF and DKIM.
6. Additionally, the status of your sending domain will be visible on the “Sender Domains & DKIM” configuration page.
Congratulations, you have successfully configured SPF and DKIM for DuoCircle.
Important note: If the provider recommends publishing also a DMARC record, there’s no need to do so if you already have a DMARC record in place, as each domain can only have one DMARC record.

