ZeptoMail is for sending transactional emails like welcome emails, password resets emails, OTPs. The process of configuring SPF and DKIM in ZeptoMail is very simple, and this article will make it much easier for you.
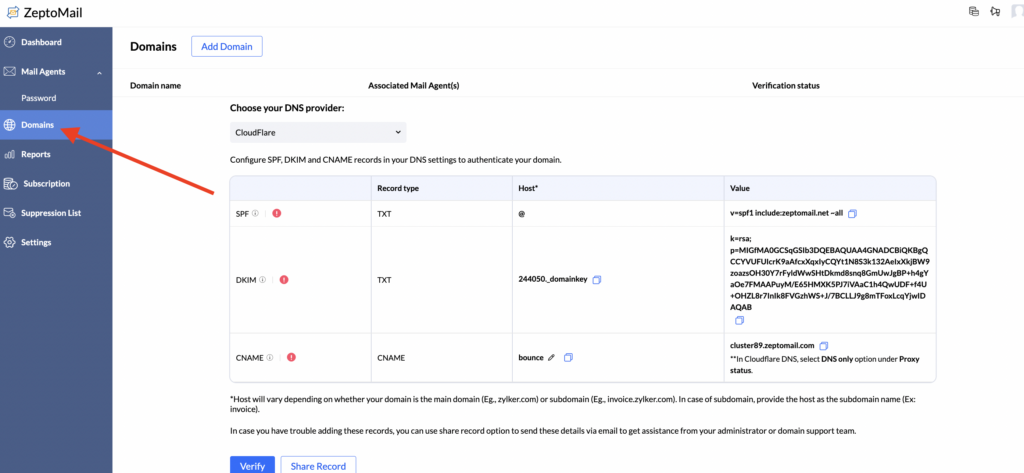
Go to the Domain section from your ZeptoMail account, and select the domain you want to authenticate, once you select the domain you will be provided with SPF, DKIM and CNAME records.

SPF Configuration
Note: If you already have an existing SPF record for your domain then you should update your existing SPF record with this include mechanism include:zeptomail.net, like the one below:
v=spf1 include:mail.zendesk.com include:_spf.google.com include:zeptomail.net ~all
If you do not have an existing SPF record, then you should publish the TXT record that ZeptoMail provides you.
See the screenshot below,

Important: Make sure to have only one SPF record for your domain, otherwise SPF will return a PermError.
For Publishing The SPF Record, Please Follow The Instructions Below,
1. Head to your DNS provider.
2 . Click the Add button to add a DNS record.
3. Select TXT, from the options of Record Type,
4. In Host/Name field enter @ or your domain name (depends on your DNS provider)
5. In the value field enter the SPF record that ZeptoMail has provided you. v=spf1 include:zeptomail.net ~all
See the screenshot below,

When you finish the process of publishing the SPF record of ZeptoMail, go back to your ZeptoMail account and click on the verify button, if you have done everything properly you will get a green verification mark next to the SPF record.
CNAME Configurations
If you want to achieve DMARC compliance with SPF, then you should have your domain in the Return Path address, in order for the SPF record to be aligned with your From address domain.
ZeptoMail provides you with a CNAME record which is used to configure the bounce address, and have your domain in the Return Path address (Mail From address, Bounce address).

You need to publish the provided CNAME record in your DNS and then set up the bounce address.
For Publishing The CNAME Record, Please Follow The Instructions Below,
1. Head to your DNS provider.
2. Click the Add button to add a DNS record.
3. Select CNAME, from the options of Record Type,
4. In the Host/Name field enter, bounce
5. In the Value field, paste the entire content you copied from the text field CNAME Record Value in ZeptoMail.
6. Save the CNAME record in the DNS Manager.
If your DNS has “Proxy Status”, then make sure to turn off the Proxy Status for the CNAME record.
See the screenshot below (DNS Cloudflare),

After publishing the CNAME record you will be able to create the bounce address with your domain. For that you need to click on Bounce Settings and create your bounce address.
See the screenshot below,

DKIM Configuration
The next step is publishing the DKIM public key of ZeptoMail in your DNS zone.

For Publishing The DKIM Record, Please Follow The Instructions Below,
1. Head to your DNS provider.
2. Click the Add button to add a DNS record.
3. Select TXT, from the options of Record Type,
4. In the Host/Name field enter, 235851._domainkey
5. In the Value field, paste the entire content you copied from the text field TXT Record Value in ZeptoMail.
6. Save the TXT record in the DNS Manager.
See the screenshot below (DNS Cloudflare),

When you finish the process of publishing the DKIM record of ZeptoMail, go back to your ZeptoMail account and click on the verify button, if you have done everything properly you will get a green verification mark next to the DKIM record.
Your domain will be verified after completing the SPF and DKIM validation. See the screenshot below:

Important note: If the provider recommends publishing also a DMARC record, there’s no need to do so if you already have a DMARC record in place, as each domain can only have one DMARC record.


