


If you get the warning ‘DMARC quarantine/reject policy not enabled’ when scanning your domain, then your domain’s DMARC policy is likely set to p=none. This means that although DMARC is configured, unauthenticated emails sent from your domain won’t be flagged or blocked by mail servers, leaving your domain open to spoofing. The none policy is a good place to start with your DMARC policy during configuration, but it’s only the beginning, and moving towards increased scrutiny should be the goal from the outset.
Key Takeaways
- The warning “DMARC Quarantine/Reject Policy Not Enabled” means your domain’s DMARC policy is set to p=none, allowing unauthenticated emails to pass without restriction.
- Changing your policy to p=quarantine or p=reject instructs receivers to quarantine or reject unauthenticated or unaligned messages, preventing spoofing and spam falsely originating from your domain.
- You can easily check your domain’s setup with EasyDMARC’s lookup tool and update your record following best practices for setting up DMARC.
- Before enforcing stricter policies, review your DMARC reports and make sure SPF and DKIM are properly aligned.
- A well-enforced policy improves domain reputation, which helps improve deliverability, strengthens brand trust, and protects your domain from impersonation, all while keeping your email communication secure and reliable.
How to Fix a Quarantine/Reject Policy Not Enabled Error
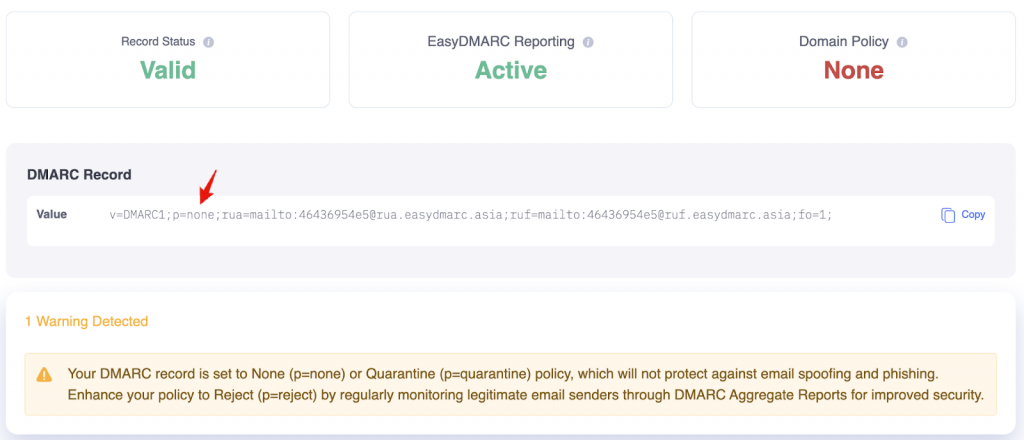
If you’re seeing the warning “DMARC quarantine/reject policy not enabled,” it likely means your domain’s DMARC record is set to p=none. This mode allows you to monitor email activity without taking any action against unauthenticated messages, leaving your domain vulnerable to spoofing and phishing attacks. To fix this, you need to update your DMARC record so it enforces a protection policy.
Log in to your DNS management console and locate your DMARC TXT record (it starts with v=DMARC1). Then, change the p=value to one of the enforcement modes: p=quarantine sends unauthenticated emails to the recipient’s spam or quarantine folder, while p=reject blocks them entirely before they reach the inbox.
Examples Before and After the Change
Before (monitoring only):
v=DMARC1; p=none; rua=mailto:[email protected]
After (with enforcement):
v=DMARC1; p=quarantine; rua=mailto:[email protected]
v=DMARC1; p=reject; rua=mailto:[email protected]
Once the record is updated, save your changes and allow up to 48 hours for DNS propagation. After that, recheck your domain using EasyDMARC’s DMARC Lookup tool to confirm that your new policy is active and your domain is now protected from unauthorized email activity.
Fix Your DMARC Policy in 5 Steps
If your DMARC policy is set to p=none, your domain is still in monitoring mode, meaning unauthenticated emails can pass through without restriction. To fully protect your domain, it’s time to move toward enforcement. Here’s how to do it safely and effectively.
Step 1: Evaluate Your Existing DMARC Policy
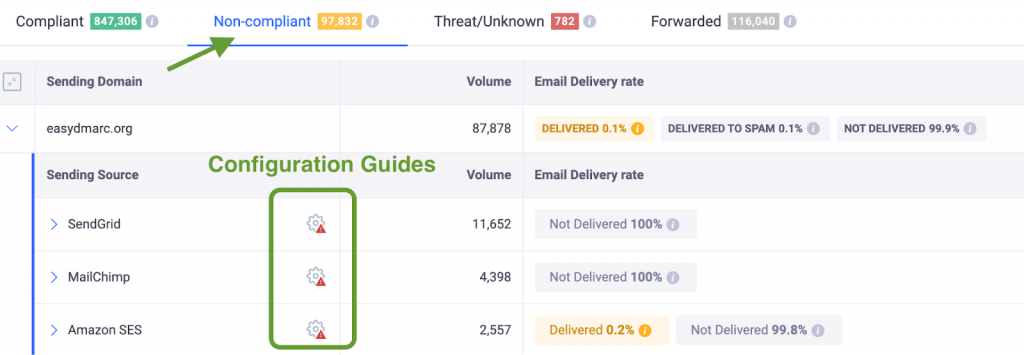
Start by reviewing your current DMARC setup and reports. Analyze the data in your DMARC aggregate reports to see which email sources are passing or failing authentication checks. Pay attention to SPF and DKIM alignment, as at least one must align for a valid DMARC pass.
This evaluation will help you identify:
- Authorized services that are correctly authenticating
- Misconfigured sources that need fixing
- Unauthorized senders trying to impersonate your domain
At this stage, you’re gathering insight to prepare for a transition from p=none (monitoring) to p=quarantine or p=reject (enforcement) without risking your legitimate email flow.
EasyDMARC simplifies this process by organizing report data into clear dashboards with four dedicated tabs, so you can easily track compliant and non-compliant sources. Each source includes remediation steps, and with over 1,400 email-sending platforms identified in our database, you can instantly access specific configuration guides for each.

Step 2: Align Your SPF and DKIM Records
Before tightening your policy, make sure your SPF and DKIM records are properly configured and aligned. These two protocols are the foundation of DMARC, and if they fail, even legitimate emails might get flagged.
DKIM alignment: Ensure each provider supports custom DKIM signing using your domain in the d= tag. If they sign with their own domain (for example, sendgrid.net), enable domain-level DKIM instead.
SPF alignment: Check with your email providers (Google Workspace, Microsoft 365, SendGrid, etc.) if they allow a custom Return-Path using your domain. The domain in the Return-Path must match your visible From: domain for SPF alignment.
Step 3: Develop an Effective DMARC Policy
Once your SPF and DKIM configurations are in order, you can safely begin adjusting your DMARC policy.
- Transition gradually: first to p=quarantine, then to p=reject once you’re confident everything is passing authentication.
- Inform relevant teams like IT, marketing, and support, so they’re prepared for potential temporary delivery issues during enforcement.
- Double-check your DNS setup and confirm that your reporting addresses (rua and ruf) are active and correctly configured to receive updates.
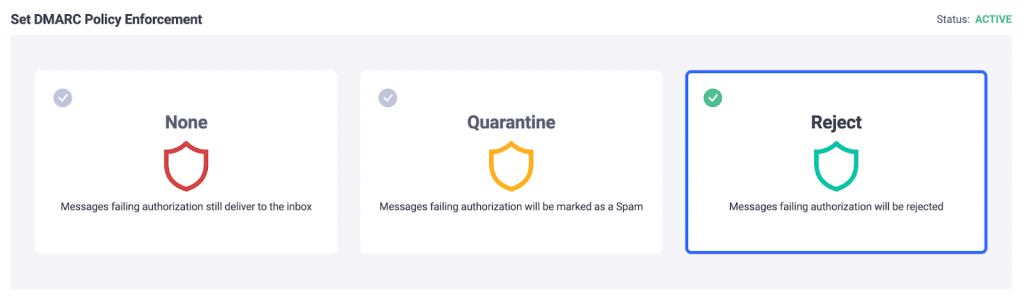
Step 4: Implement and Publish Your Updated Policy
Now it’s time to apply your new DMARC record in your DNS.
- Log in to your DNS hosting provider’s dashboard (for example, Cloudflare, GoDaddy, or Namecheap).
- Locate your DMARC record (or create a new TXT record if none exists).
- Update the policy value to reflect your desired level of enforcement; p=quarantine or p=reject.
Example record values:
- v=DMARC1; p=quarantine; rua=mailto:[email protected]
- v=DMARC1; p=reject; rua=mailto:[email protected]
If you’re using EasyDMARC’s managed DMARC solution, you can skip the manual DNS edits and just switch your policy with one click in the dashboard. The CNAME-based system will automatically update your DNS configurations for you, keeping your setup consistent and secure while following the best practices for setting up DMARC.
Step 5: Monitor, Review, and Adjust
Once enforcement is in place, your domain will start rejecting or quarantining unauthenticated emails. Continuous monitoring is key to maintaining strong email security, so keep an eye on:
- New or unauthorized senders appearing in reports
- SPF/DKIM changes for newly added services
- Delivery performance for legitimate emails
EasyDMARC’s reporting tools provide real-time insights and alerts, so you can quickly resolve issues before they impact your mail flow. This ongoing visibility helps ensure your domain remains protected as your email ecosystem evolves.
DMARC Policy Best Practices
A DMARC setup works best when it’s cared for over time. Following best practices will help you keep your policy effective and your domain safe from spoofing.
Start with a monitoring-only policy to gather insight into how your emails are being sent and authenticated, so you can see which sources are legitimate and which may need fixing before enforcement. Give yourself at least a few weeks to review your DMARC aggregate reports to find out who’s sending emails on behalf of your domain and confirm that your SPF and DKIM settings are properly aligned.
Once you’re confident that all your trusted senders are authenticating correctly, move your policy step by step, from p=none to p=quarantine, and finally to p=reject. DMARC reports can be tricky to read in their raw XML format. Use platforms like EasyDMARC to get a clear visual breakdown of compliant and non-compliant sources.
Your email ecosystem evolves, and your DNS records should too. Update your SPF when adding or removing third-party senders, and rotate DKIM keys regularly to maintain strong security.

Benefits of Enabling DMARC Policy
Implementing a strict DMARC policy provides several significant benefits, consistent with trends observed during DMARC adoption in Australia:
- Protection Against Spoofing: A reject policy prevents malicious actors from using your domain to send fraudulent or malicious emails, protecting your brand’s reputation and your recipients from phishing attacks.
- Improved Deliverability: Over time, having a robust DMARC policy improves your domain’s reputation with email servers, leading to better email deliverability for legitimate messages.
- Clear Visibility: With DMARC aggregate and failure reports, you gain valuable insights into how your domain is being used, enabling you to take corrective action. The reporting features also help you identify potential misconfigurations in your DNS records, ensuring that legitimate emails are delivered correctly.
- Enhanced Email Security: By enforcing a quarantine or reject policy, you add an extra layer of security, ensuring that only legitimate emails reach your recipients. Your DNS hosting provider can help maintain and monitor your DNS records, keeping your domain secure over time.
Eligibility for BIMI Implementation: With a quarantine or reject DMARC policy, you can implement Brand Indicators for Message Identification (BIMI) for certain email providers like Gmail, Yahoo Mail, and Fastmail. This email standard allows businesses to display their logos next to authenticated emails in recipients’ inboxes. BIMI enhances brand visibility and provides a visual trust signal to recipients.
Fixing Warning ‘DMARC Policy Not Enabled for GoDaddy’
If GoDaddy is your DNS provider, here’s how to fix the warning message ‘DMARC Policy Not Enabled GoDaddy’:
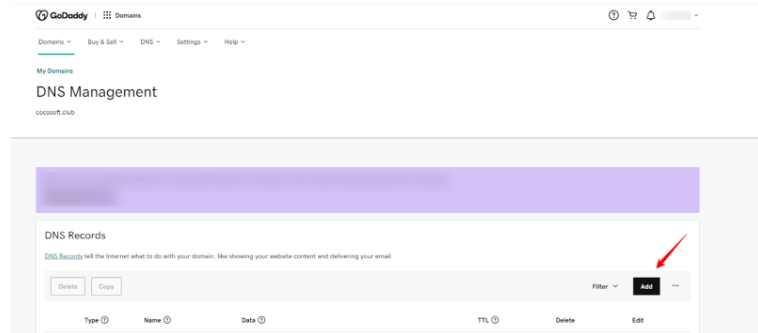
1. Log into GoDaddy and go to the Domain Manager.
2. Select your domain and click ‘DNS’ to access the DNS management page.
3. Generate a DMARC record with our EasyDMARC DMARC Record Generator and copy the value.
4. Click Add Record.
- Set Type to TXT
- Name should be _dmarc
- Paste the code from our DMARC Record Generator
- Ensure you include a DMARC policy value (p=quarantine or p=reject)
5. After adding or updating your DMARC record, it may take a few minutes to a few hours to propagate.6. Verify the record using EasyDMARC’s Domain Scanner.
Create DMARC Policies, Protect Your Business
Every email you send carries your name and reputation. When your domain isn’t protected, it becomes an easy target for spoofing, and that trust can quickly be shaken.
DMARC helps you prevent that. It builds a layer of security that keeps your communication authentic and your brand image strong. Once it’s in place, you can connect with customers, partners, and colleagues knowing your messages are safe and verified.
With EasyDMARC, getting there takes only a few simple steps. The platform guides you through setup, policy management, and monitoring, helping protect your domain and the relationships built around it.
Frequently Asked Questions
You can update your policy by editing your domain’s DMARC record in your DNS settings. Look for the p= tag and change its value to quarantine or reject, depending on how strict you want to be. If you use EasyDMARC’s Managed DMARC, this process is even easier; you can switch policies right from your dashboard with a single click.
Enabling a DMARC reject policy does not affect email deliverability if your setup is correct. A reject policy only blocks emails that fail authentication, so as long as your SPF and DKIM are properly aligned, your legitimate messages will be delivered as usual. It’s best to move gradually from none to quarantine then reject while monitoring reports to make sure everything runs smoothly.
With p=none, your domain only monitors activity, it doesn’t block anything. This leaves the door open for spoofing and phishing attacks using your domain name. Switching to a quarantine or reject policy adds a layer of protection and helps maintain your domain’s reputation.