The DomainKeys Identified Mail (DKIM) is a way to verify the email sender’s identity. This is done by using a digital signature associated with the sender’s domain. The signature is used to confirm that the email came from that domain and has not been tampered with.
The primary purpose of DKIM is to prevent email spoofing. DKIM signature tells your recipients who’s the domain’s rightful owner and prevents anyone from impersonating your domain. How does DKIM work?
DKIM works by signing your email messages with a private key. This digital signature is added to the header of each message. When the recipient server receives a message, it uses the public key in the DNS record (the TXT record) to verify the signature. The signature can deliver the message to the recipient if the signature is valid.
Note: Before diving into steps to add DKIM on your NameCheap, it is essential to understand that each provider has their own Private/Public Keys that they provide to their customers.
This article will be using Zoho Mail as an example. We’ve generated the DKIM Public signature from the Zoho Mail portal, and in the following steps, we will implement it in our Namecheap DNS.
Namecheap offers you two fields for adding TXT record data: Host and Value. In this example, we want to add our new DKIM record for our subdomain mail._domainkey (mail is our subdomain, and _domainkey is Zoho Mail required parameter).
So we’ve put the value mail._domainkey in the Host field and added our DKIM public key in the Value field. You can add multiple DKIM records with multiple subdomains by repeating these steps with different Host and Value field values.
Now let’s get into the process of adding a DKIM record to Namecheap with some simple steps.
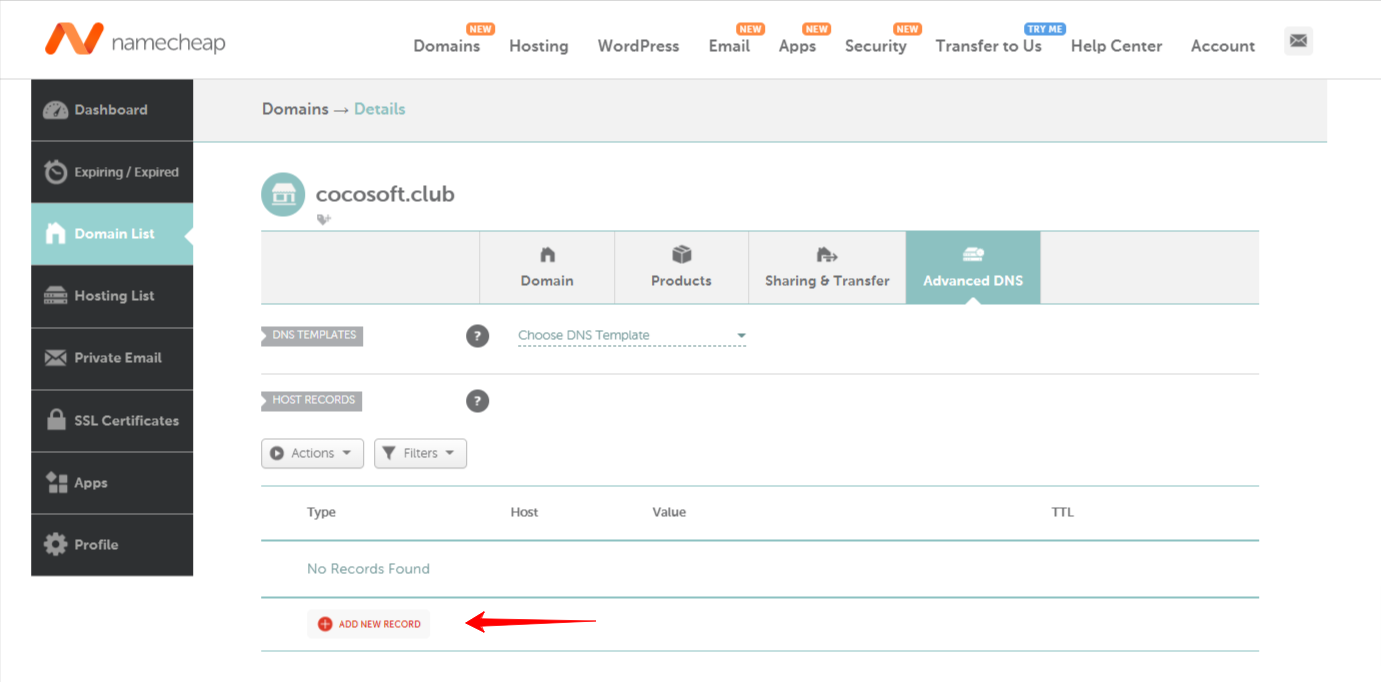
Step 1. Select Add New Record
First, you must select the “Add New Record” in a few simple steps.
- Login into your Namecheap account
- Open the Domain List section
- Move to Advanced DNS
- Add New record as shown below
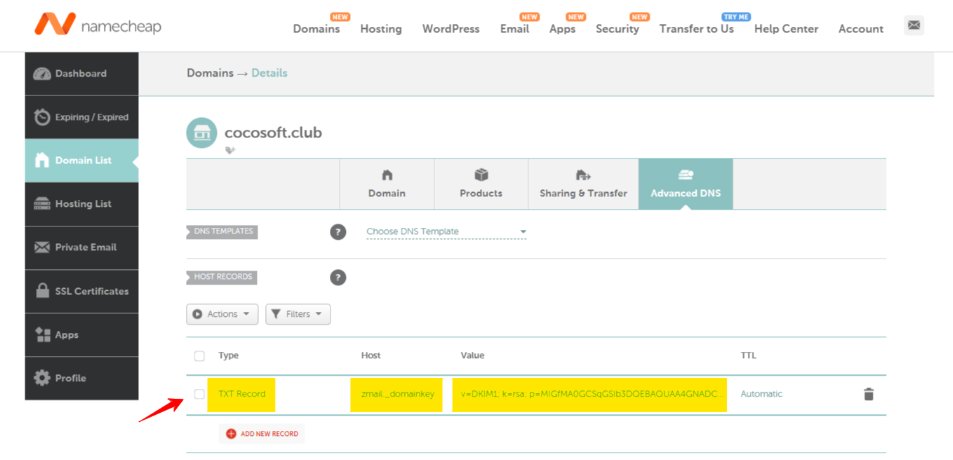
Step 2. Add your DKIM Type, Host, and Value
The second step is to make sure to add your DKIM Type, Host and Value.
- Go to the Domain List
- Open the Advanced DNS
- And fill in the fields as shown in the screenshot below
Here’s an example on how to fill in the Type, Host and Value fields.
Note: In this example, the Value part contains the public DKIM signature that was generated from the Zoho Mail portal.
| Type | Host | Value |
| TXT Record | zmail._domainkey | v=DKIM1; k=rsa; p=MIGfMA0GCSqGSIb3DQEBAQUAA4GNADCBiQKBgQC+BeYApQiIf2makHXZzj/vmRNO
kmQXqVu4aKYcNqj5ANGbJNYGROfo63TTlu2KUWootMQ1nHiiKfFODPO6LjUwn3zp mRv7ONmcm40QOysLrv5cGk+l9letBM7DnVqrvHsMOMHVv1q87fy1n4DuqDM/cVKM qaAExyY+yAKZfUfuRQIDAQAB |
Step. 3 Click “Save” to Finalize your NameCheap DKIM setup
The last step of your Namecheap DKIM record setup is clicking “Save” and finishing your setup and your DKIM Record will be successfully added to your Namecheap account.
How Can EasyDMARC Help?
Your domain security is an essential aspect of your business. That’s where EasyDMARC comes to help along with its tools. EasyDMARC provides a streamlined interface for managing your DMARC records with ease.
EasyDMARC helps you to:
- Easily create and manage your DKIM records
- Get detailed reports on the performance of your DKIM record
EasyDMARC also includes a comprehensive reporting system that will keep you up-to-date on the performance of your DMARC policy.


