
HubSpot forms and contact lists can collect email addresses that are invalid, risky, or unable to receive emails. Over time, these addresses can make your contact data less reliable and affect how you use your database.
EasyDMARC Email Verification helps you check email addresses without leaving your HubSpot environment. You can configure the integration, choose which verification results to allow, and test individual or bulk email addresses from the EasyDMARC Email Verification interface.
In this guide, we’ll show you how to set up and configure EasyDMARC Email Verification for HubSpot step by step.
What You’ll Need Before You Start
Before you begin, make sure you have:
- A HubSpot account
- An EasyDMARC account
- Access to the EasyDMARC Email Verification integration
- The required API credentials and verification credits for the setup
Once you have everything ready, you can start setting up Email Verification in HubSpot.
How to Set Up EasyDMARC Email Verification in HubSpot
Once you have access to the EasyDMARC Email Verification integration, you can configure it for your account. You will need to add your API credentials, choose which email verification results to allow, and decide what should happen if the verification service is temporarily unavailable.
Follow the steps below to get started.
Step 1: Open the API Settings
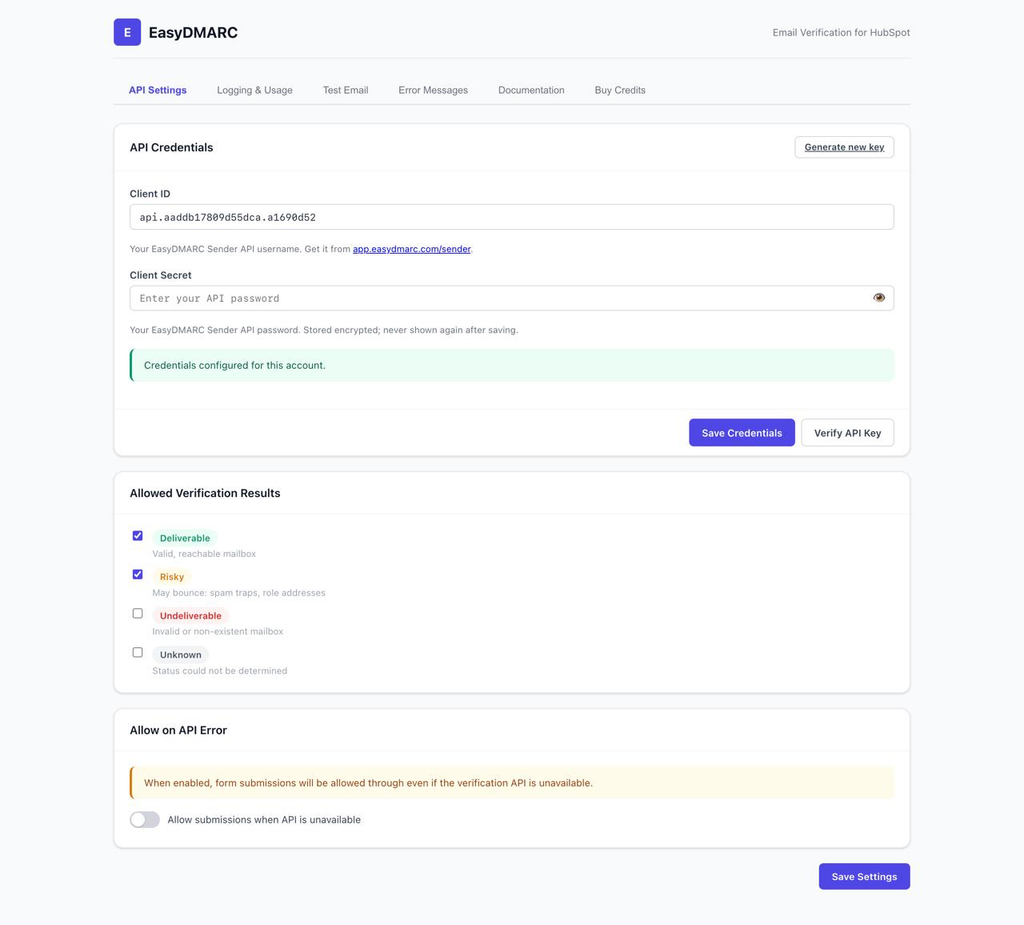
After accessing EasyDMARC Email Verification for HubSpot, open the API Settings tab. This is where you connect the integration to your EasyDMARC account and choose how different email verification results should be handled.
The API Settings page contains three main configuration areas: API Credentials, Allowed Verification Results, and Allow on API Error. Start by connecting your EasyDMARC API credentials.
Step 2: Connect Your EasyDMARC API Credentials
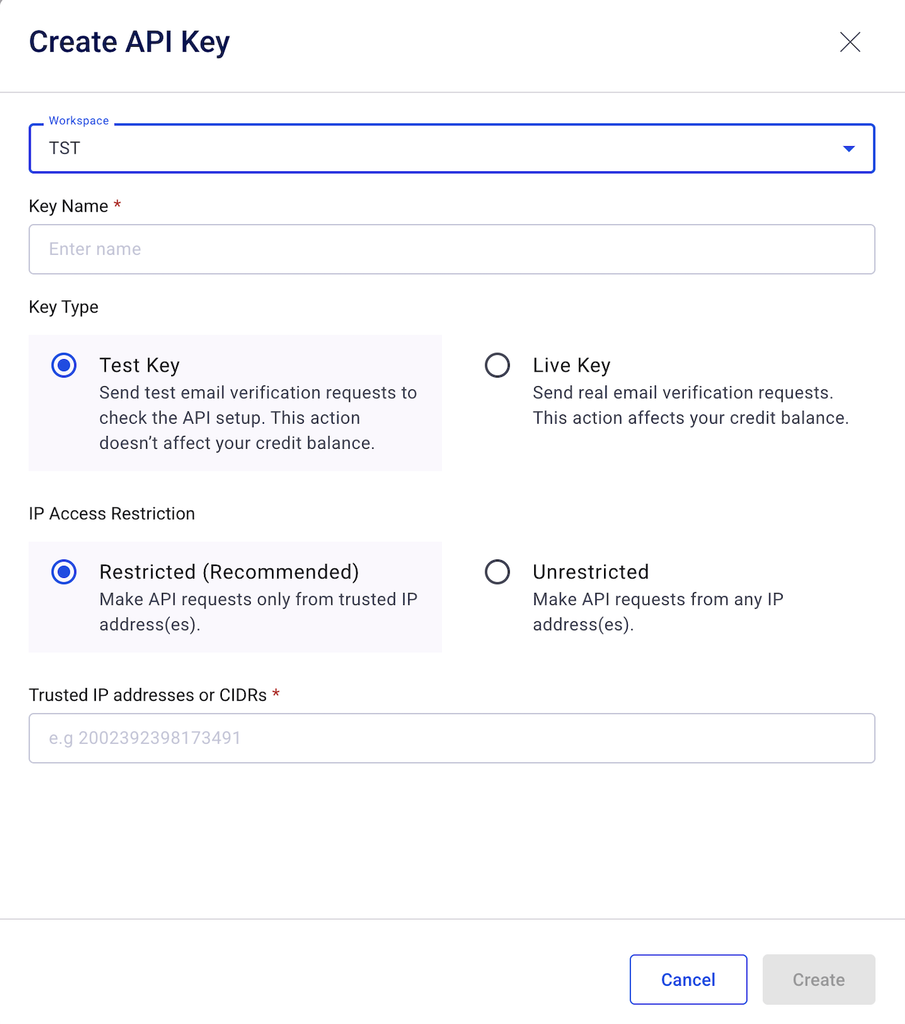
Head to your EasyDMARC account and switch to EasySender. Go to Settings → API. This is where your API keys live. Generade new API keys and copy credentials. Then head back to your HubSpot account.
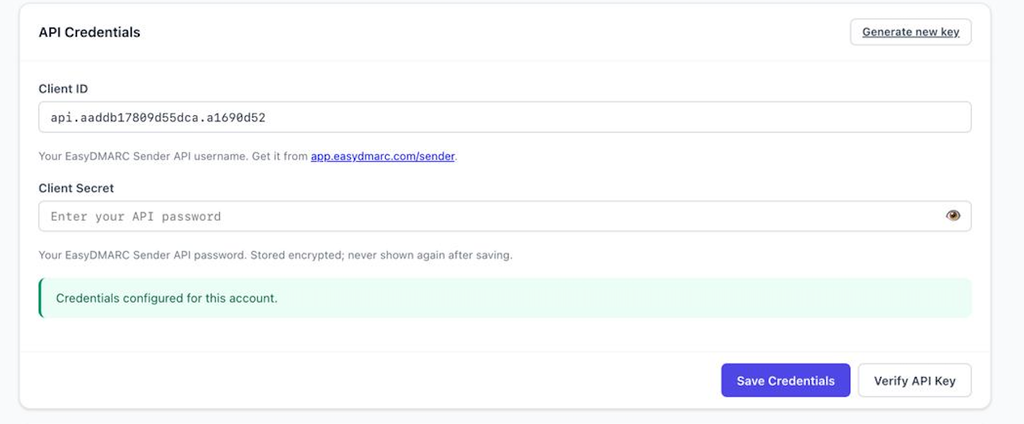
Under API Credentials, enter your Client ID and Client Secret to connect the Email Verification integration to your EasyDMARC account.
If you need to create new API credentials, click Generate new key. This will generate a new key that you can use to connect the integration to your EasyDMARC account. After generating the key, enter the required credentials in the Client ID and Client Secret fields.
After entering the required information, click Save Credentials. Then click Verify API key to confirm the connection is working properly.
Once the API credentials have been verified successfully, you can choose how the integration should handle different verification results.
Step 3: Choose Which Verification Results to Allow
Next, configure how the integration should handle different email verification results. Under Allowed Verification Results, you can choose which types of addresses to allow:
- Deliverable: Valid, reachable mailboxes
- Risky: Addresses that may bounce, including spam traps or role addresses
- Undeliverable: Invalid or non-existent mailboxes
- Unknown: Addresses whose status could not be determined
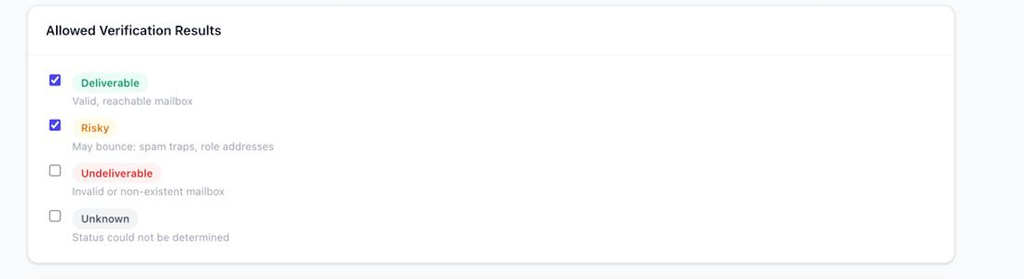
These settings let you control which email addresses can proceed based on their verification results. For example, you can allow Deliverable addresses while blocking Undeliverable ones.
You can also decide how cautiously you want to handle Risky and Unknown addresses. Select the options that match your requirements, then continue to the API error settings.
Step 4: Decide What Happens When the Verification API Is Unavailable
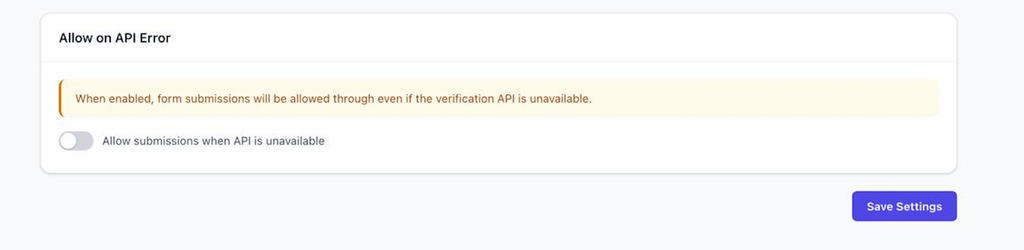
The Allow on API Error setting controls what happens when the EasyDMARC verification API is temporarily unavailable.
If you enable Allow submissions when API is unavailable, form submissions can continue even when an email address cannot be verified because the API is unavailable. If you leave this option disabled, the integration can block the submission from proceeding until the verification service is available.
Choose the option that works best for your workflow. Once you have finished configuring the settings, click Save Settings.
How to Test and Use Email Verification
Once your EasyDMARC Email Verification integration is configured, you can start checking email addresses directly from the interface. You can verify individual email addresses for quick checks or upload a CSV file to verify a larger list.
Verify a Single Email Address
To check an individual email address, open the Test Email section and enter the address you want to verify. Then click Verify Email to run the verification.
The verification result will show whether the address can be delivered and provide additional details about the email address and domain. Depending on the information available, you may see details related to the address type, domain, MX records, disposable status, spam trap detection, and other verification checks.
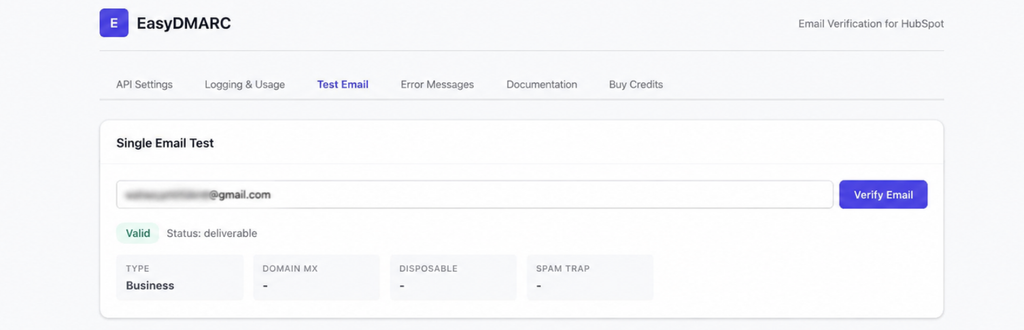
Before moving on to bulk verification, you can use this option to test individual addresses and understand how the integration displays verification results.
Verify Email Addresses in Bulk Using a CSV File
If you need to check multiple email addresses at once, you can use the bulk CSV verification option. Open the bulk verification area and upload or drag and drop your CSV file into the available upload field.
The interface will display the file requirements and limits supported by the integration. Make sure your CSV file follows the requirements shown on screen before starting the verification process.
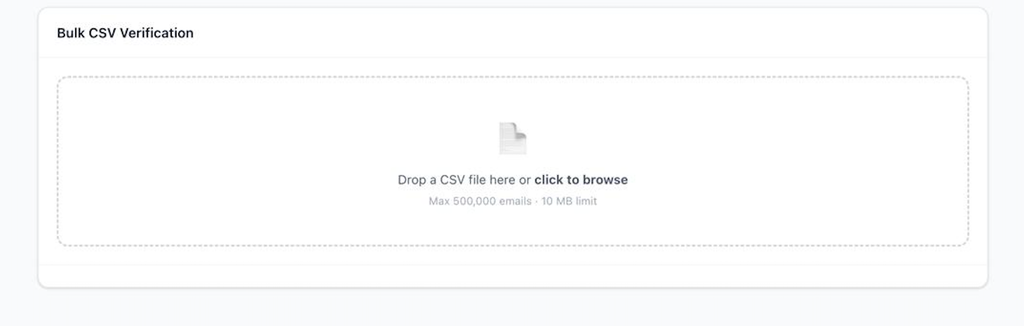
After uploading the file, follow the available on-screen instructions to start the bulk verification process.
Track Your Email Verification Credit Usage
The Logging & Usage section helps you monitor how your email verification credits are being used. Here, you can review the number of credits allocated to your account, how many have already been used, and how many remain available.
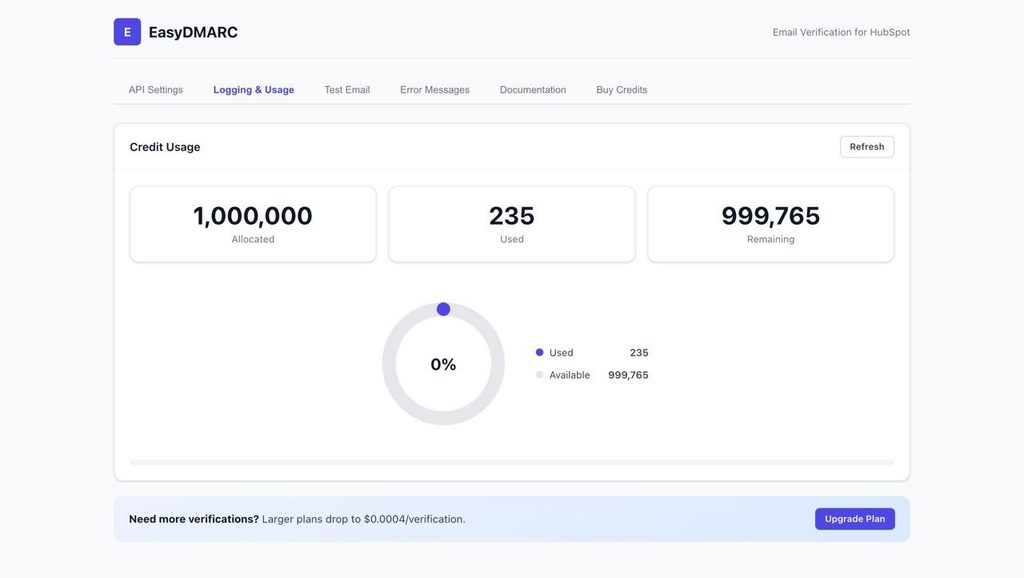
Regularly checking this section can help you keep track of your verification activity and available credits. If you need to verify more email addresses, the interface also provides an option to upgrade or purchase additional credits.
Customize Email Verification Error Messages
You can customize the messages displayed when an email address fails verification or when the verification service encounters an issue. Open the Error Messages section to manage these messages.
The interface includes separate message fields for different situations:
- Invalid Email Message: shown when an email address is considered invalid or cannot be used.
- Risky Email Message: shown when an address receives a risky verification result.
- API Error Message: shown when an error prevents the email address from being verified.
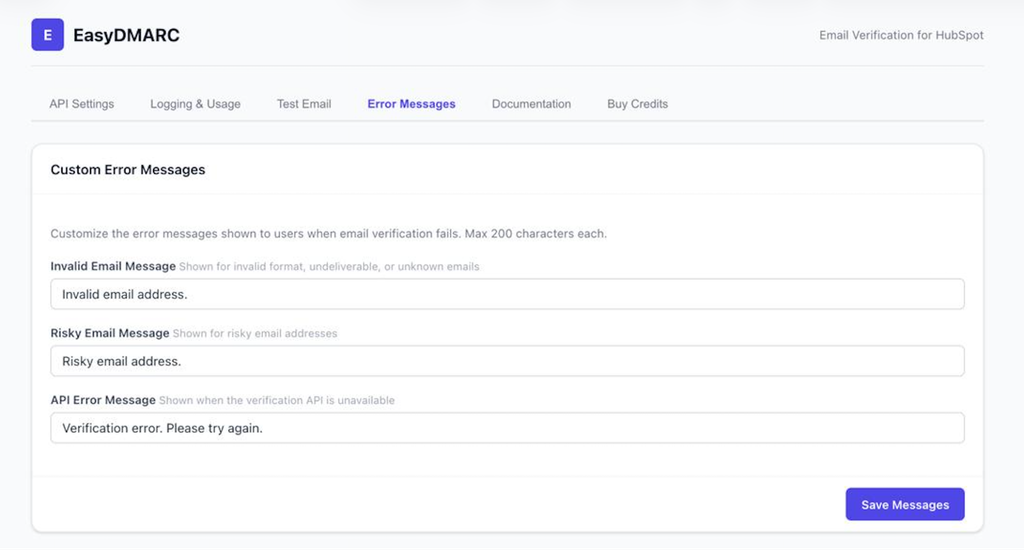
Update the messages to match the language and tone you want users to see on your forms. This can help make verification errors clearer and give users a better understanding of why their submission cannot continue.
After making your changes, save the updated settings.
Find Additional Help and Documentation
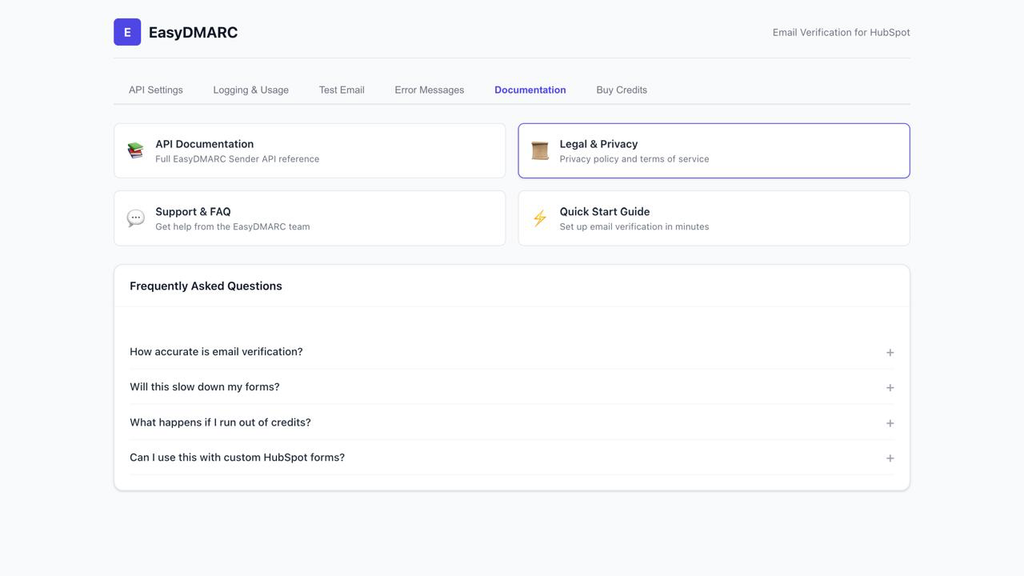
If you need more information about the integration, open the Documentation section. The available resources provide access to additional product and technical information, including the API Documentation, Support & FAQ, Legal & Privacy, and Quick Start Guide.
Use these resources when you need help understanding the integration, troubleshooting an issue, or learning more about the available features.
Why This Is Useful
Using EasyDMARC Email Verification directly in HubSpot can help you keep your contact data cleaner by preventing invalid or risky email addresses from entering your database. You can also use verification results to make better decisions in your workflows without exporting contacts to a CSV file, verifying them somewhere else, and importing them back into HubSpot.
Keeping verification inside the HubSpot environment makes the process simpler and easier to manage. You can check individual email addresses, verify large lists in bulk, and choose how different verification results should be handled from one place. You can also track your verification credit usage to see how many checks you have used and how many are left. If you need to verify more addresses, you can add more credits as needed.
This can save time, reduce manual work, and help you maintain a more reliable contact database.
Pricing
EasyDMARC Email Verification uses credits, and each email verification uses one credit. Plans start at $2.70 per month for 1,000 verifications and go up to $375 per month for 1,000,000 verifications. As your verification volume increases, the cost of each verification becomes lower.
| Plan | Verifications/month | Monthly price | Cost per check |
| Starter | 1,000 | $2.70 | $0.0027 |
| Growth | 10,000 | $18.00 | $0.0018 |
| Professional | 50,000 | $60.00 | $0.0012 |
| Business | 250,000 | $180.00 | $0.0007 |
| Enterprise | 1,000,000 | $375.00 | $0.0004 |
A 14-day free trial is also included with the Starter plan.
Get Started
To start using EasyDMARC Email Verification in HubSpot, search for “EasyDMARC Email Verification” in the HubSpot Marketplace. You can also explore available plans and start your free trial on the EasyDMARC Email Verification pricing page.
Once your integration is connected, you can begin verifying individual email addresses, checking contacts in bulk, and configuring verification settings based on your workflow.

 We’re glad you joined EasyDMARC newsletter! Get ready for valuable email security knowledge every week.
 You’re already subscribed to EasyDMARC newsletter. Continue learning more about email security with us