SMTP2GO is a cloud-based email deliverability solution that helps businesses send transactional and marketing emails via SMTP or API and view reports on email delivery. But before sending any emails through SMTP2GO, let’s first authenticate your domain by configuring SPF and DKIM records.
To set up SPF and DKIM for SMTP2GO, follow these steps:
Step 1: Add Your Sender Domain
Step 2: Review the CNAME Records
Step 3: Publish CNAME Records in Your DNS
Step 4: Test the Configuration
Step 1: Add Your Sender Domain
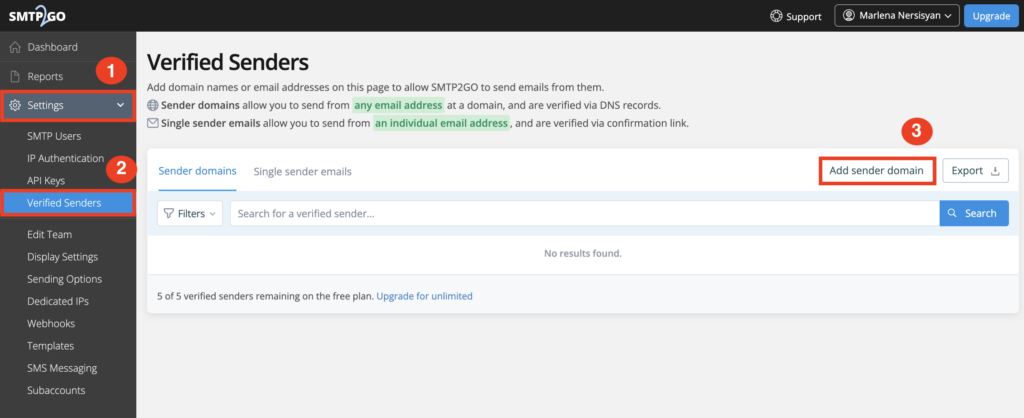
To add your sender domain, follow these steps and note the corresponding numbers in the screenshot below:
- Click on the “Settings” tab from the left side of the dashboard.
- From the drop-down menu, select “Verified Senders.”
- On the “Verified Senders” page, click the “Add Sender Domain” button.
Step 2: Review the CNAME Records
Once your domain is added, you must review the three CNAME records you are given to publish in your Domain Name System (DNS) host. A CNAME record, or Canonical name record, allows you to create a more memorable or user-friendly domain name that points to your Fully Qualified Domain Name (FQDN).
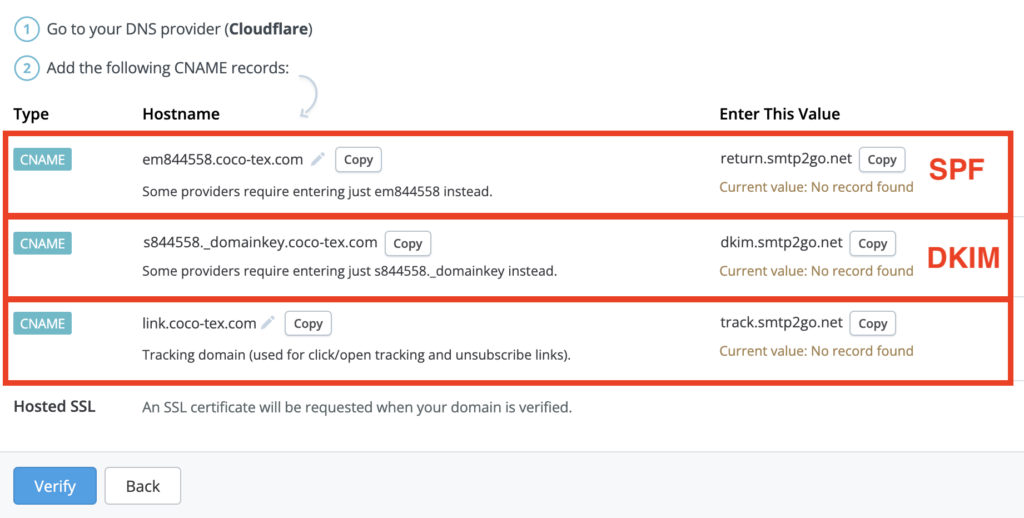
First CNAME record (SPF): The first record is for SPF. By adding it to your DNS host, your domain will be mapped to SMTP2Go’s domain (return.smtp2go.net), which has the IP addresses whitelisted in it. You do not need to manually modify your existing SPF record as you already have authentication and alignment for SPF.
Second CNAME record (DKIM): The second record is for DKIM. Adding it ensures that emails are cryptographically signed for authentication.
Note: The third CNAME record, related to tracking (clicks/opens and unsubscribe links), is not covered in this blog.
Step 3: Publish CNAME Records in Your DNS
To publish the CNAME records in your DNS, copy and paste the SPF and DKIM CNAME records to your DNS host (e.g., Cloudflare).
Step 4: Test the Configuration
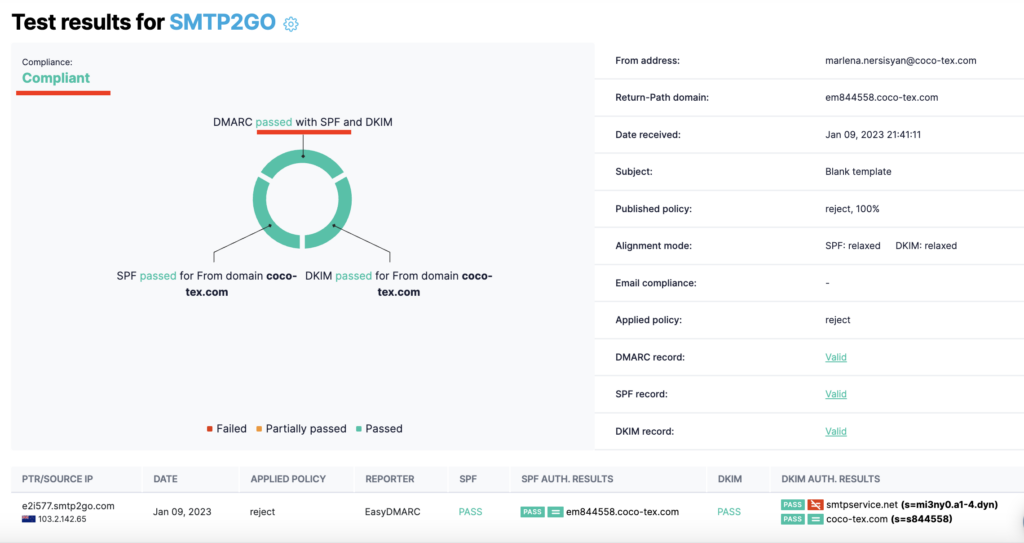
After publishing the records, test that everything is configured correctly using SMTP2Go’s Email Investigation tool.
You can test it with our Email Investigation tool. (See the screenshot below)
Following these instructions ensures your domain is properly authenticated for secure email delivery through SMTP2GO. With SPF and DKIM in place, your emails will be less likely to encounter deliverability issues or end up in spam folders.
If you need assistance with this configuration, you can contact our DMARC experts.
Important note: If the provider recommends publishing also a DMARC record, there’s no need to do so if you already have a DMARC record in place, as each domain can only have one DMARC record.
