


Our informative post will help you find out how you can setup Sender Policy Framework (SPF), DomainKeys Identified Mail (DKIM) Signatures on your Microsoft 365 email to eliminate spam from your domain and increase security.
Microsoft requires you to configure the following DNS records for your domain: Microsoft 365 SPF(previously called o365 spf record) and DKIM.
SPF records allow receiving servers to check whether an email with the specified source domain was actually sent from a server authorized by the owner of this domain.
DKIM adds a digital signature to each message. This allows the receiving server to check if the message has been sent from an authorized sender, faked or changed upon delivery.
Microsoft 365 (o365) SPF Record Configuration
In order to authorize Microsoft 365 to send emails on your domain behalf, you will need to create or update your SPF Record which includes the following mechanism: include:spf.protection.outlook.com
You can achieve this easily with our SPF Record Generator tool; here are the steps:
Step 1: Generate a new Microsoft office 365 SPF Record
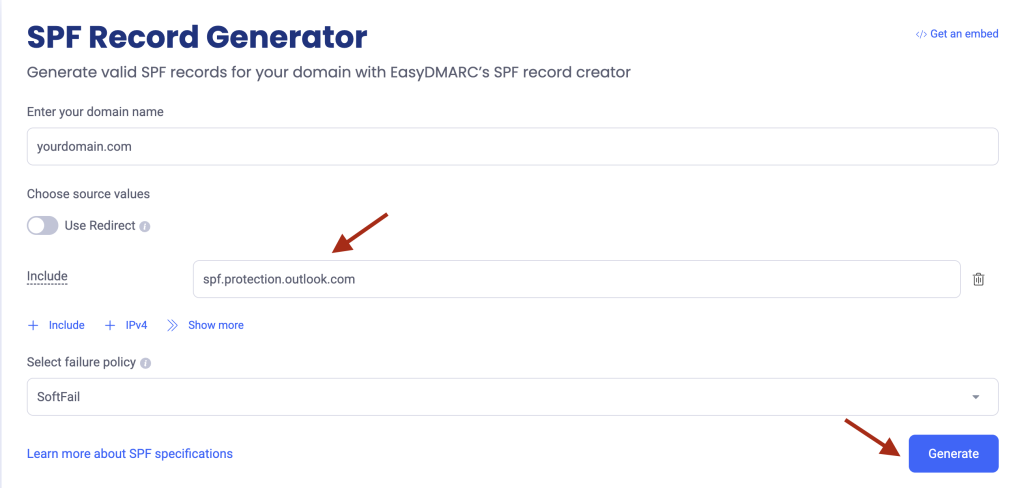
Step 2: Copy the newly generated office 365 SPF Record
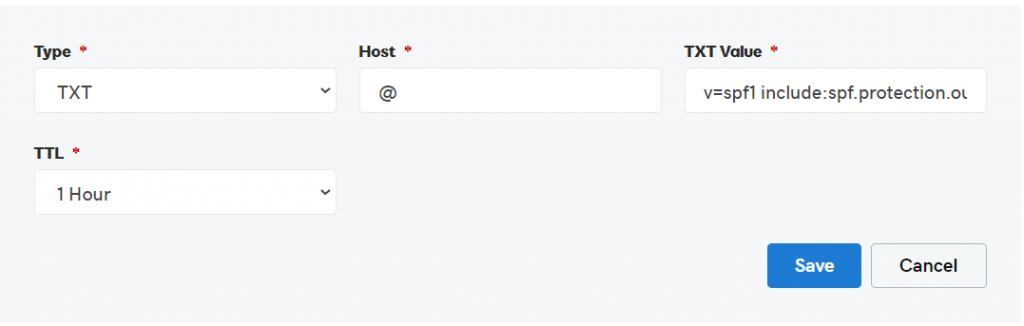
Step 3: Update your DNS TXT Record for SPF at your domain provider (We will show examples with GoDaddy and Cloudflare)
E.g GoDaddy
E.g Cloudflare
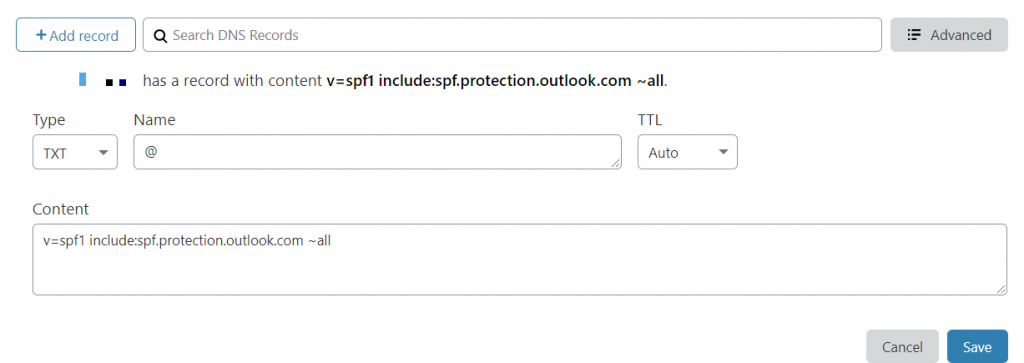
Step 4: Click Save
Important Note: Make sure you don’t create multiple SPF TXT records for office 365 on one domain. If you do, SPF will return a PermError.
If you are using multiple IPs, ESPs, Third-Party services for your various email strategies, you should include them in a single SPF Record.
E.g v=spf1 ip4:17.67.137.221 include:spf.protection.outlook.com include:thirdpartyservice.com ~all
Microsoft 365 DKIM Configuration
Step 1: Go to the DKIM Page from your Microsoft 365 Defender portal https://security.microsoft.com/dkimv2
Step 2: Next, select your organizational domain name, and click “Enable”.

Step 3: Once you click on the “Enable”, a new pop up window will appear with the applicable CNAME Records.
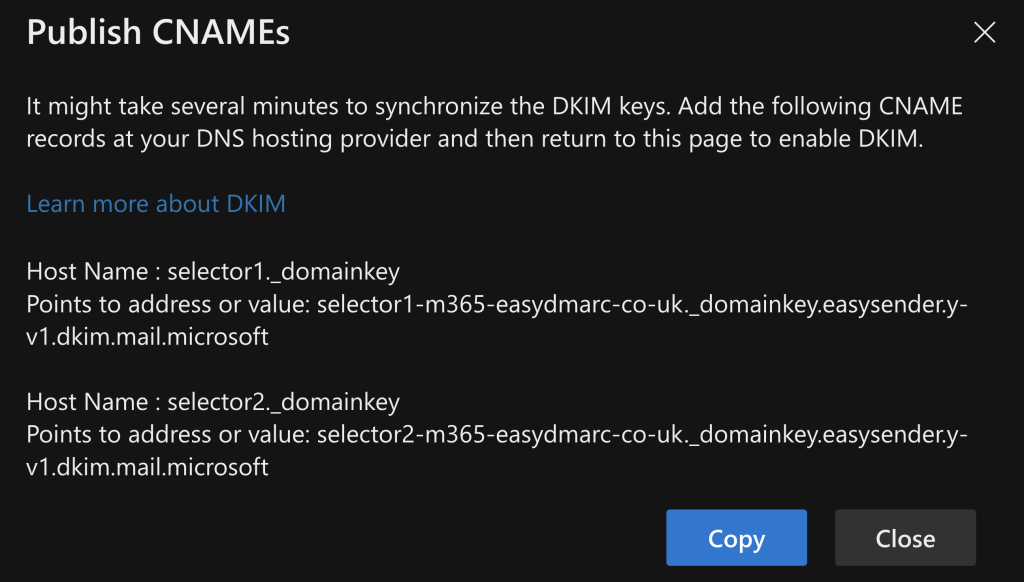
To summarize, this contains 2 separate CNAME Records which looks like this:
- Type: CNAME
Host Name: selector1._domainkey
Value: selector1-yourdomain-com._domainkey.tenantdomain.y-v1.dkim.mail.microsoft (This part is UNIQUE to each domain) - Type: CNAME
Host Name: selector2._domainkey
Value: selector2-yourdomain-com._domainkey.tenantdomain.y-v1.dkim.mail.microsoft (This part is UNIQUE to each domain)
Step 4: Copy these 2 CNAME Values and paste them in your DNS Provider (In this example, we’ll be using CloudFlare)
1st CNAME:
2nd CNAME:

Step 5: Once the 2 CNAME Records are implemented in your DNS, go back to your Microsoft 365 Defender portal and re-click the “Enable” button. If everything has been configured correctly, you’ll get to see the green check with the “Enabled” notification.

Important note: If the provider recommends publishing also a DMARC record, there’s no need to do so if you already have a DMARC record in place, as each domain can only have one DMARC record.
Congrats, you now successfully authenticated your outgoing mail stream from Office 365 with SPF and DKIM.
This is unclear and incomplete from my perspective. In the SPF Generator, what doe we put in the other fields? iP4 for example. What IP address goes here? What does “pass if source IP matches” mean? My domain is managed by Godaddy, my website is hosted by a local small company, I use Office 365 for my email.
Hello Nils,
As mentioned in the article, to whitelist Microsoft itself in your SPF Record, the entry should be:
v=spf1 include:spf.protection.outlook.com ~allIf you use other third-party services, dedicated hosts, etc., you need to incorporate them into your SPF Record.You can only have one SPF record as per domain/subdomain. Here’s an example of how your SPF might be structured:
v=spf1 ip4:[ip4-address] include:spf.protection.outlook.com include:[thirdpartyservice.com] ~allFor a comprehensive analysis of your outgoing email ecosystem, it’s recommended to implement DMARC and receive Aggregate reports. Having DMARC in place enables you to make informed adjustments to your SPF records, add IP addresses, and more, based on the insights gained from these reports.
Everything correct, but if you do “just” this, selector2 will probably not work. You need to use the “Rotate DKIM keys” button.
Rotating the DKIM key right at the start isn’t important. It’s usually suggested to switch it up every 6-12 months, depending on the key size.
At first, ‘selector1’ signs all your outgoing emails from Microsoft 365. When you rotate, ‘selector2’ takes over and signs them instead.
Thanks Hagop,
Am I right in thinking that if both CNAME’s selector1._domainkey & selector2.domainkey are correctly configured, that Rotating the DKIM keys will only change the signing mechanism and won’t have an impact of email deliverability from the domain?
You got that right!
Please update the whole procedure as it doesn’t reflect the current screens spf generator.
Thanks for the feedback! We updated it!