For any organization, its email infrastructure must be crucial.
The first step to start protecting your domain for your clients, vendors, partners, and everybody you send emails to is time to look into email security protocols.
DMARC, the Domain-based Message Authentication Reporting and Conformance, is designed to make internet service providers trust the emails sent from your domain.
DMARC is an email authentication, reporting and policy protocol. Email domain owners can protect their domain from fraudulent emails, also known as phishing.
What is Namecheap? Namecheap offers shared hosting, reseller hosting, VPS hosting, and dedicated servers. It also provides domain name registration and email hosting.
Several independent reviewers have ranked it as one of the best web hosting providers.
If you’re using Namecheap as your DNS provider, you’ll need to complete a DMARC record setup in Namecheap.
Steps to Add DMARC Record in Namecheap
Now let’s see how to add DMARC record in Namecheap in a few simple steps.
How to Generate a DMARC Record
There are two ways to generate a DMARC record:
- When you directly register on EasyDMARC, our system automatically provides you with a DMARC Record upon adding your domain
- You can also use EasyDMARC’s DMARC Record Generator tool to get a DMARC Record
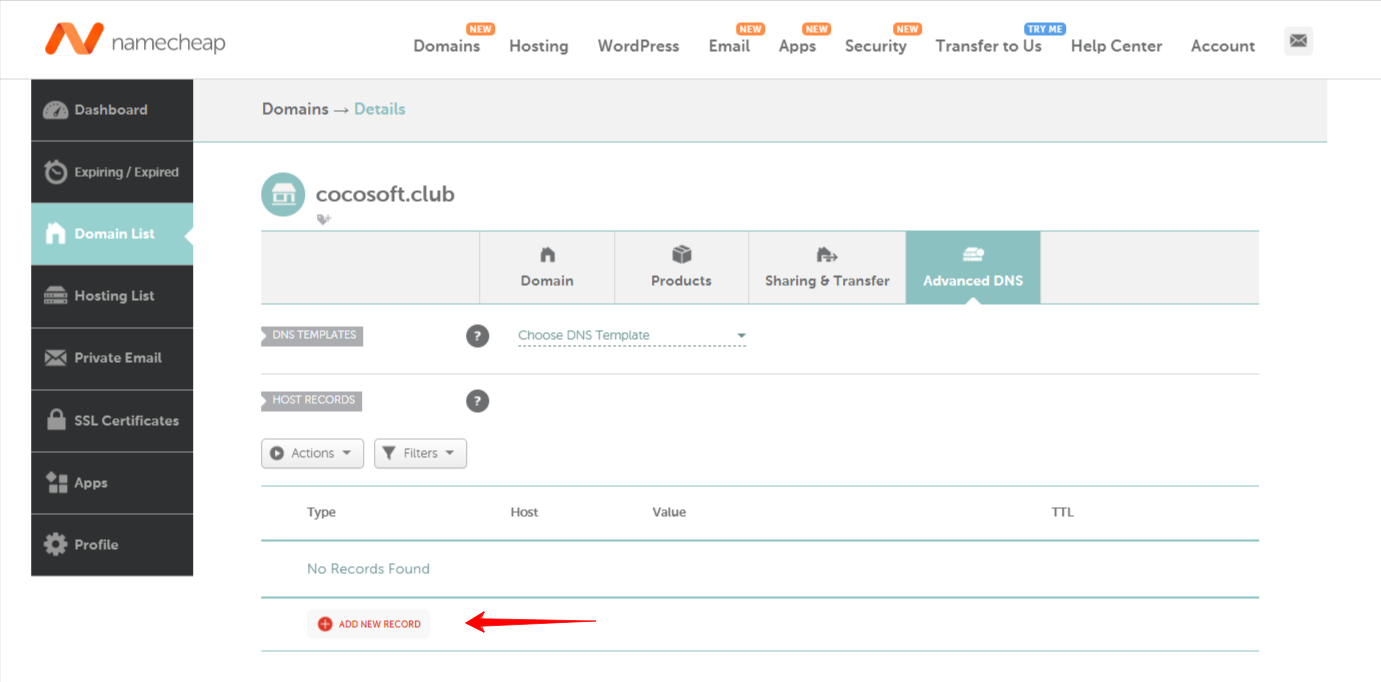
Step 1. Setup Your DMARC Record in Namecheap
After generating DMARC Record, you need to update it in your NameCheap.
- Login to your Namecheap account
- Open the Domain List
- Move to the Advanced DNS
- Add New Record as shown below
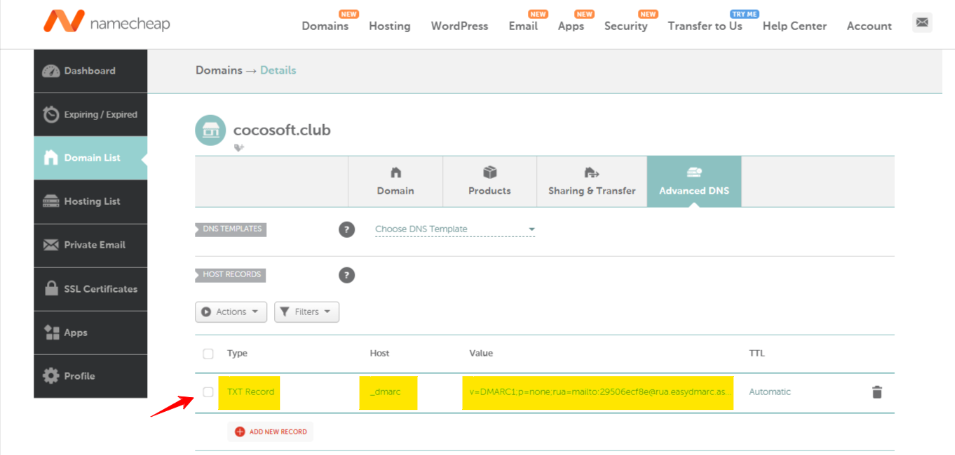
Step 2. Add your DMARC Type, Host, and Value
Make sure to add your DMARC Type, Host, and Value.
- Go to the Domain list
- Open the Advanced DNS section
- Add Type, Host and Value fields
Follow this example which shows how to fill in the fields:
| Type | Host | Value |
| TXT Record | _dmarc | v=DMARC1;p=none;rua=mailto:[email protected];ruf=mailto:[email protected];fo=1; |
Step 3. Click “Save” to finish your NameCheap DMARC setup
After updating the fields, click “Save” and finish your NameCheap DMARC record setup.
Important Recommendations
It’s always recommended to first start your DMARC Journey in Monitoring mode (p=none).
That will help you gather reports, identify & authenticate legitimate email servers used in your organization, and advance your Policy to higher levels such as Quarantine or Reject.
How Can EasyDMARC Help?
Cybercriminals are always looking for ways to impersonate reputable domains and trick victims. Every company and individual has to know what’s going on in their domain environment.
By publishing a DMARC record in your Namecheap account, you can prevent misuse, gain increased visibility of your email domain and, of course, be secured.
Use EasyDMARC Tools to make your email authentication journey as smooth as possible.


