


If you are using Brevo and looking for a step-by-step guide to authenticate your email, then you’re in the right place. Email authentication is not only essential for secure email communication but also a crucial step in ensuring the successful delivery of your emails. Google, Yahoo, and now Microsoft have all made email authentication mandatory for bulk email senders. So, if you don’t want your emails to be flagged as spam, rejected, or not delivered at all, follow this guide on Brevo SPF, DKIM, and DMARC configuration and ensure you’re all set.
The First Step Of Sender Verification On Brevo For SPF And DKIM
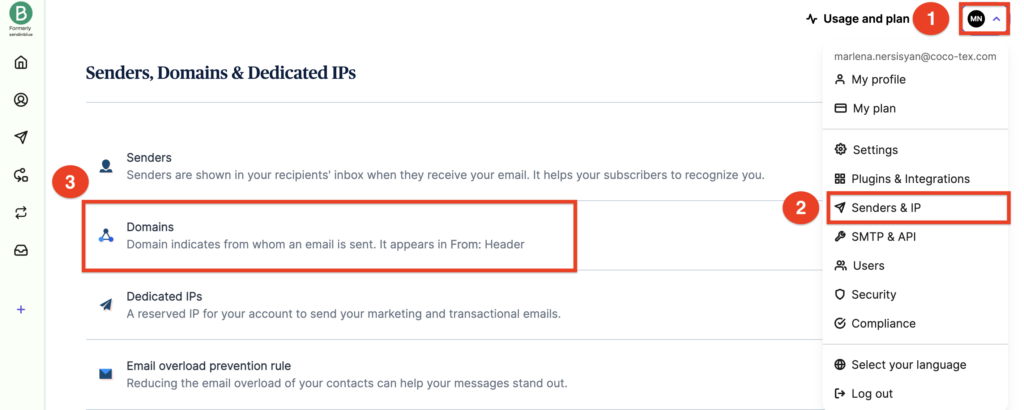
Your first step is to access the Domains page. To access the Domains page:
1 – click on your name at the top-right side of the screen.
2 – Select Senders & IP.
3 – Click on Domains.
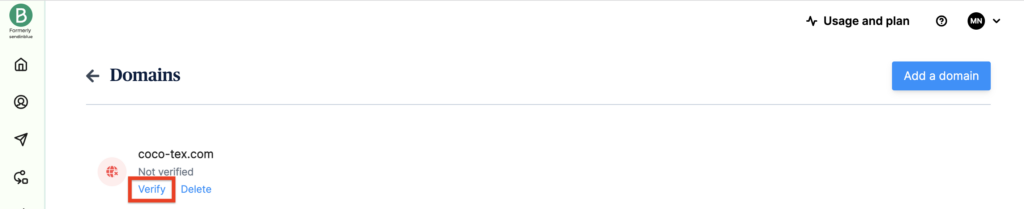
On the Domains page, find or add the domain you want to authenticate, and then click ‘Verify’.
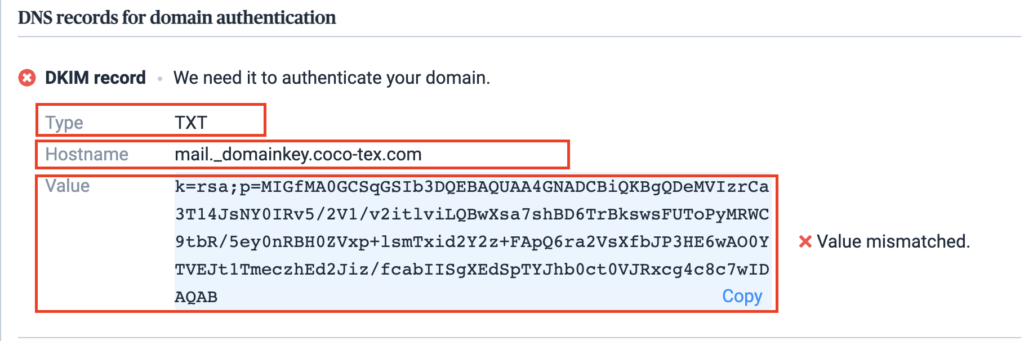
Once you click on the ‘Verify’ button, Brevo will provide you with two DNS records: Brevo code and a DKIM record.
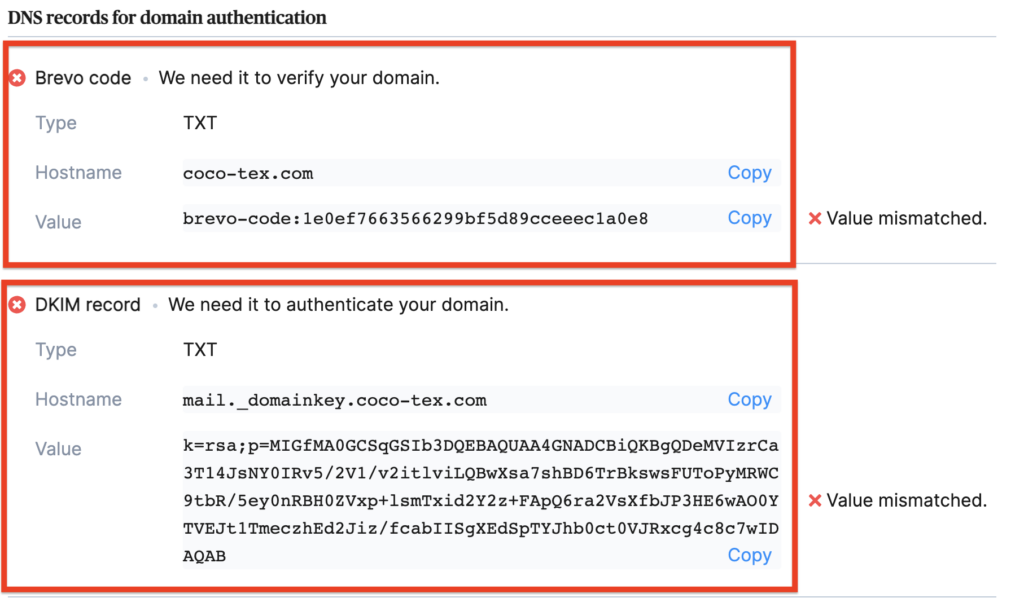
The Brevo code is only for domain verification. You need to publish that TXT record in your DNS for your domain to be verified.
Now we’ll delve into the details of domain authentication and explain how to add SPF and DKIM records in your DNS provider.
Brevo SPF Record Configuration
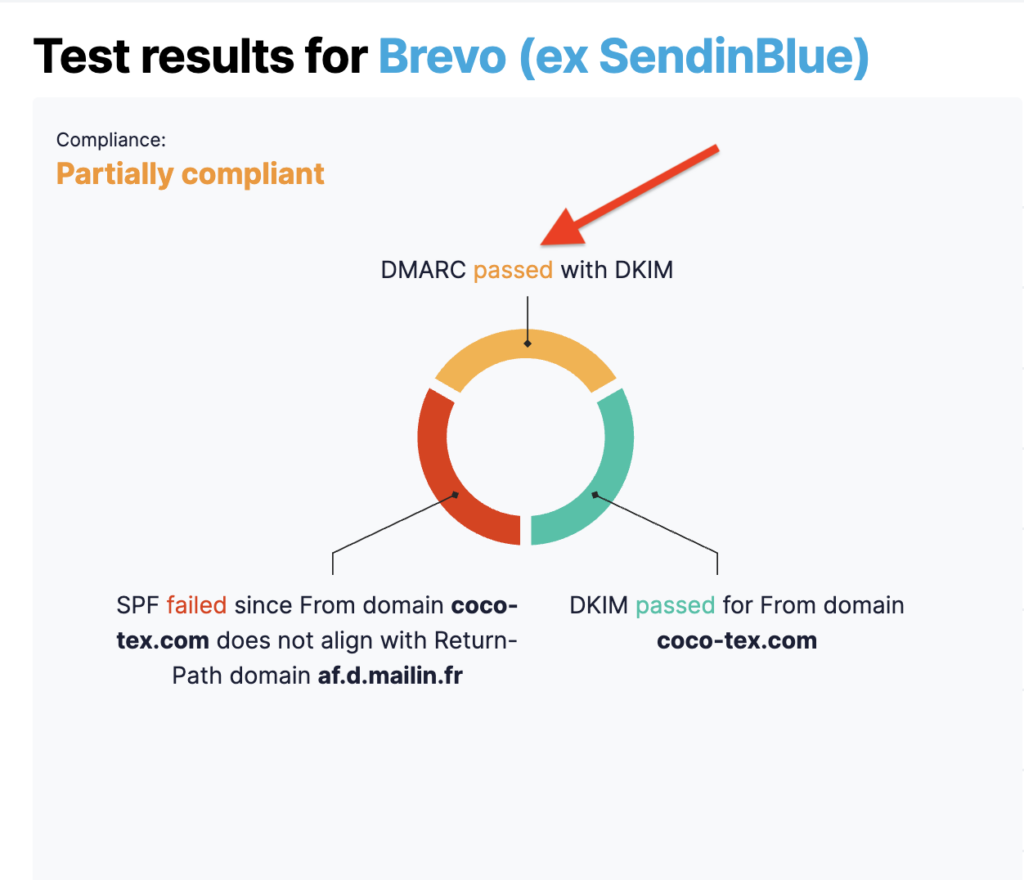
Note: There is no need to set up an SPF record for Brevo, as the “Envelope From” domain will always be handled by Brevo’s servers. For SPF to be aligned, you should have your “From address” domain in the “Envelope From” address. Brevo uses “af.d.mailin.fr”, “kh.d.sender-sib.com” and other domains as the “Envelope From” domain. During the DMARC record lookup, this “Envelope From” domain will not match with your “From address” domain, so SPF alignment will fail. This happens not only with Brevo but with the majority of Email Service Providers.
If you add the include provided by Brevo (include:spf.sendinblue.com) in your SPF record, your SPF record will look like the one below,
v=spf1 include:zoho.com include:spf.sendinblue.com ~all
Also, keep in mind that DMARC requires either DKIM or SPF to be authenticated and aligned, so you will pass the DMARC check even without SPF alignment. SPF alignment failing won’t affect your email deliverability if you have DKIM in place. Thus, you need to set up only DKIM for Brevo.
Brevo DKIM Record Configuration
Brevo provides you with a DKIM TXT record to publish in your DNS zone.
How to Add the Provided TXT Record in Your DNS?
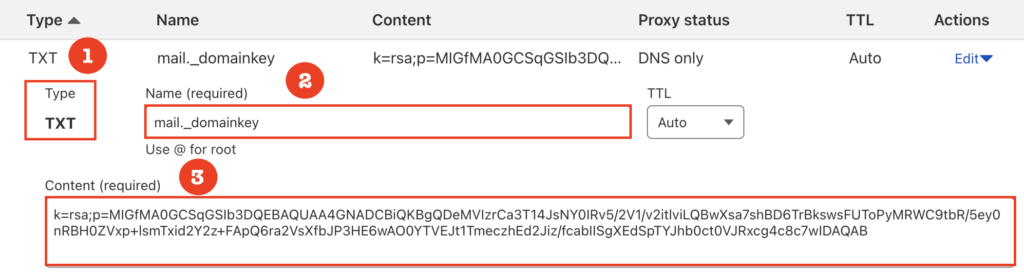
Step 1: Head to your DNS and create a new DNS record, setting the type to TXT.
Step 2: Copy the Hostname field to paste into the corresponding field in your DNS. For the TXT name/host, what you enter depends on your DNS host. Some require you to enter the full mail._domainkey.coco-tex.com, others only need the mail._domainkey part, as it automatically appends your domain name at the end.
Step 3: In the Value/Content field, copy and paste the generated Value code under the DKIM record.
Like the one below (DNS Cloudflare),
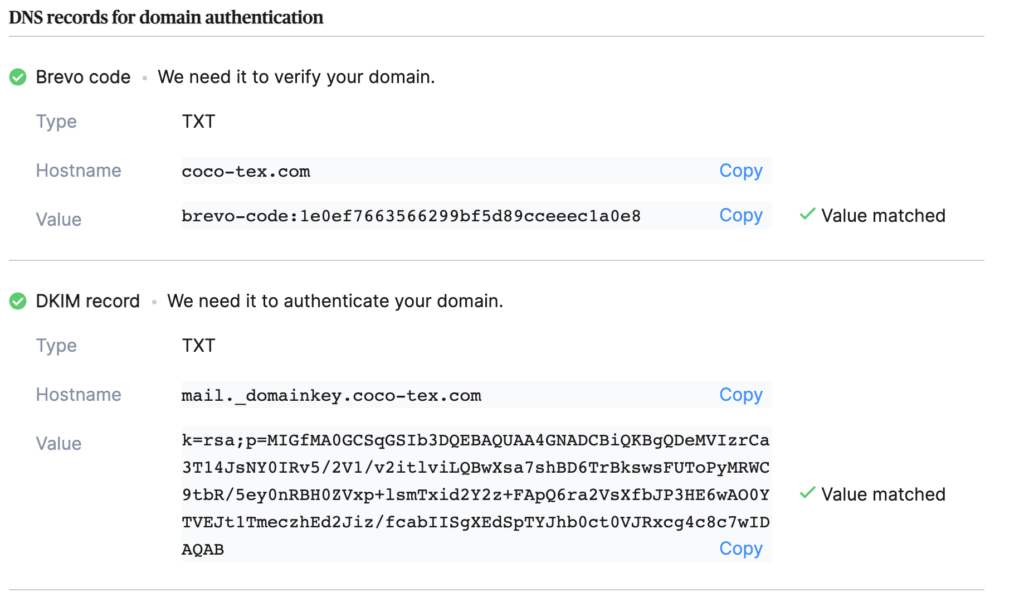
Once you have finished publishing the TXT records in your DNS, return to your Brevo account and click the Check Configuration button. If everything is done properly, a green check mark appears next to the Value fields for the DKIM record.
Brevo DMARC Configuration with EasyDMARC
It’s essential to note that DMARC compliance for Brevo is achieved solely through DKIM authentication and alignment. Although you’ve not configured SPF, DMARC will still pass.
So, after having SPF and DKIM in place, it’s time to authenticate with a DMARC policy. DMARC is a complex protocol, but if you’ve decided to do it yourself, here is a checklist to follow:
- Register on EasyDMARC,
- Add your domain to our portal to generate a DMARC record with p=none,
- Copy the record and update your DNS,
- Wait for the DMARC reports to gather information on your outgoing email ecosystem and their email authentication results,
- Prepare for long-term compliance and achieve full enforcement.
Later, you can test it with our Email Investigation tool:
Important note: If the provider recommends also publishing a DMARC record, there’s no need to do so if you already have a DMARC record in place, as each domain can only have one DMARC record.
If you’re still confused, contact us for detailed support and guidance throughout your email authentication journey.
Not adding SPF or adding the SPF record you suggested still results in alignment failure.
David, thank you for your comment!
We’ve already stated in the article that achieving SPF alignment with Brevo is not possible.
Whether you include their SPF or not doesn’t matter, but our engineers included it as it’s also recommended in their steps.
While you cannot get spf alignment using the steps in this article (send in blue is deprecated), you can follow the steps provided by brevo https://help.brevo.com/hc/en-us/articles/115000240344-Set-up-your-dedicated-IP-in-Brevo
With the dedicated IP your spf can then contain your private IP like ip4:77.32.170.5 (example) and both easydmarc and postmark show spf alignment for “sender-sib.com”
Thank you for your feedback and for sharing the Brevo article.
You’re absolutely right that using a dedicated IP and configuring SPF with your specific IP (e.g., ip4:x.x.x.x) can help achieve SPF alignment. However, our article focuses on the default setup used by the majority of Brevo users, which is based on their shared infrastructure. In that shared environment, SPF alignment is not possible, and that’s the context we aimed to address.
While dedicated IPs offer more flexibility and control, they are generally reserved for specific use cases and may not be applicable or practical for all users. For that reason, we don’t recommend dedicated IPs as a default approach for achieving SPF alignment.
We appreciate your input and will consider noting this distinction in the article for clarity.
Excellent guide! The step-by-step explanation of the Brevo (ex Sendinblue) SPF & DKIM Setup makes what can be a confusing process much easier to follow. I also appreciate that you explained why these authentication records matter for email deliverability instead of just showing where to click. Understanding the “why” helps prevent configuration mistakes later on. Thanks for putting together such a practical resource!