


Campaign Monitor is an email marketing service which enables users to create fun and beautiful email campaigns. If you are using the Campaign Monitor email service provider to send emails on your domain’s behalf, you should set up a DKIM record to ensure your emails are sent from your domain.
This article will help you setup Campaign Monitor email authentication in a few easy steps to ensure it passes the DMARC alignment check.
Campaign Monitor SPF Record Configuration
As you probably know, SPF helps protect your domain against spoofing and prevent your outgoing messages from being marked as spam by receiving servers. SPF specifies the mail servers that are allowed to send emails from your domain. Receiving mail servers use SPF to verify that incoming messages that appear to come from your domain were indeed sent by you.
Campaign Monitor SPF record setup has a little nuance, though. As Campaign Monitor always handles your Return-Path domain, SPF alignment is not possible for this service. While sometimes, you’ll be suggested to add “include:_spf.createsend.com” to your SPF record, you won’t result in achieving alignment. Instead, you’ll just whitelist the IP addresses of Campaign Monitor, simply wasting precious DNS lookups.
In case you add the include provided from Campaign Monitor in your SPF record, your SPF record will look like the one below,
v=spf1 include:zoho.com include:mxsspf.sendpulse.com include:_spf.createsend.com ~all
Just be informed that there is no need to do this, as SPF will fail due to misalignment, even if you add that “include” in your SPF record. However, with SPF missing, you can still achieve DMARC compliance by configuring the Campaign Monitor DKIM record.
DKIM for Campaign Monitor
For DKIM to function, you must have two keys, a private key and a public key.
– Private key is used to create the signature on all outgoing messages.
– Public key is used to determine if the signature on a message is valid or not.
If you’re using third-party ESPs (Campaign Monitor, Microsoft365, etc.) DKIM public keys are obtained from their portals. ESPs won’t share their Private Keys for privacy and security concerns.
DKIM protects the data of the email message. This is done by giving the email a digital signature. If the DKIM is valid, it means that the message body and attachments have not been modified.
Campaign Monitor DKIM Record Setup
Campaign Monitor DKIM record configuration is as easy as following a few steps. We have all explained below.
Step 1: In Campaign Monitor, click your profile image at the top right, then click Account settings.

Step 2: Click Sending Domains.
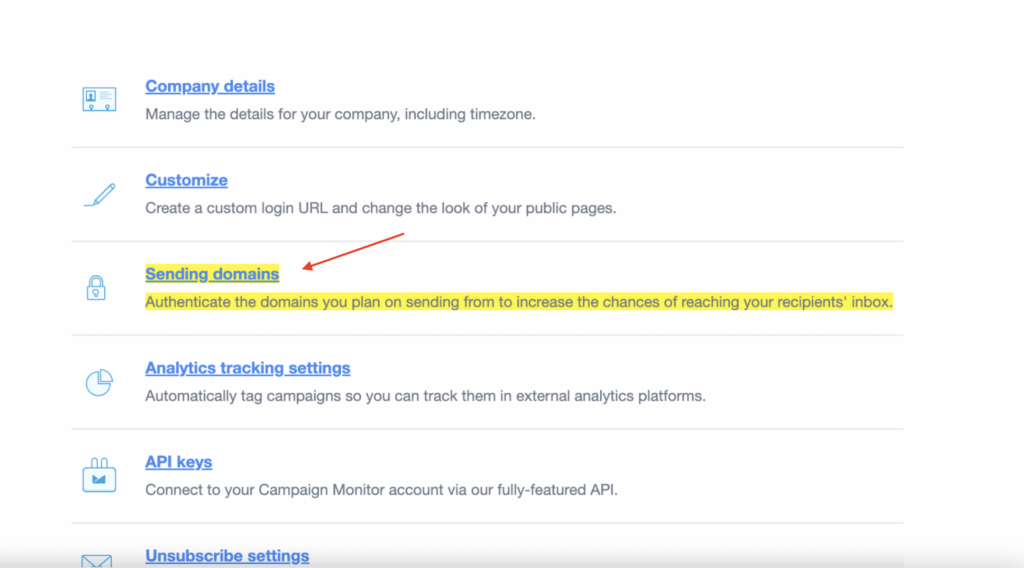
Step 3: Find the “Add domain” button near “Manage your sending domains” and click it.

Step 4: Enter a fully qualified domain name in the Domain field. We’ve added “easydmarc.com” for demonstration purposes.

Step 5: Once you add your domain, the system will provide you with a TXT record. Add it to your DNS. Here is how to do it.
How to Add the Provided TXT Record in Your DNS?
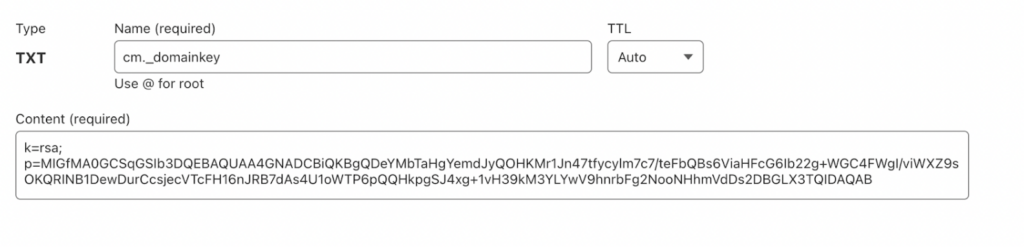
Step 1: Head to your DNS, create a new DNS record, and set the type to TXT.
Step 2: Copy the Name/host field to paste into the corresponding field in your DNS. For the TXT name/host, what you enter depends on your DNS host. Some require you to enter the full cm._domainkey.yourdomain.com, others only need the cm._domainkey part. In case you need specific instructions, we have a number of articles on how to add DMARC to the most popular DNS providers.
Step 3: Otherwise, simply copy and paste the TXT record in the Value box into the appropriate field in your DNS.
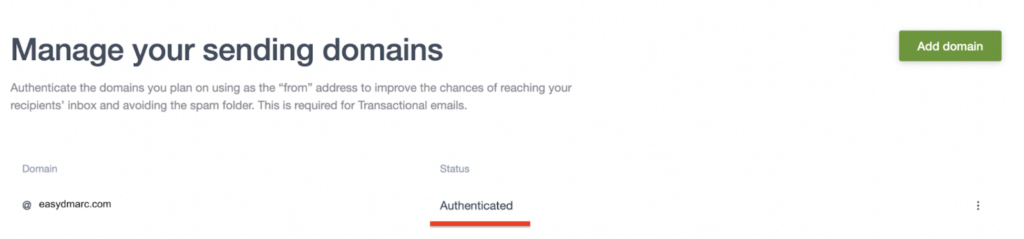
Step 4: Go back into Campaign Monitor and click “Authenticate now” at the bottom of the screen.
You will see a confirmation message once the domain has been successfully authenticated. The status of the domain will also change to “authenticated”, as shown in the screenshot below.
Congratulations, you’ve successfully applied DKIM to Campaign Monitor.
Final Thoughts
Campaign Monitor email authentication setup is one of those cases when DMARC compliance is achieved via DKIM authentication and alignment only. Although you’ve not configured SPF, DMARC will still pass. (See the screenshot below)

Important note: If the provider recommends publishing also a DMARC record, there’s no need to do so if you already have a DMARC record in place, as each domain can only have one DMARC record.
Congratulations, you now successfully authenticated your outgoing mail stream from Campaign Monitor with DKIM.