


NetSuite sends a wide range of critical business emails, including order confirmations, invoices to customer notifications, and campaign messages. When these emails are not properly authenticated, even legitimate communications can be filtered, delayed, or rejected by modern mailbox providers.
This guide walks you through how NetSuite email authentication works behind the scenes and outlines the exact steps to configure SPF and DKIM for your domain. You’ll also learn how to identify common configuration mistakes, resolve delivery errors quickly, and ensure your NetSuite email stream remains trusted, verified, and consistently delivered.
What Is Bronto and Its Connection With NetSuite
Bronto was a cloud-based email marketing platform widely used for sending promotional and transactional emails. It later became part of the NetSuite ecosystem, allowing businesses to manage customer data, marketing campaigns, and email communications from one connected system. Because Bronto sends emails on your domain’s behalf, proper email authentication is important to maintaining trust and deliverability. This is where configuring the NetSuite SPF record is critical. By authorizing NetSuite-related sending services, such as Bronto, in your SPF record, you help receiving mail servers verify that emails are legitimate and not spoofed.
Why SPF and DKIM Are Required for NetSuite Emails
When you have a properly configured NetSuite SPF record and DKIM authentication, emails sent through NetSuite are trusted by receiving mail servers and reach inboxes instead of spam folders.
Prevents Domain Spoofing and Phishing Risks
Without SPF and DKIM, attackers can easily impersonate your domain and send fraudulent emails pretending to come from your organization. Email providers cannot reliably verify whether NetSuite is authorized to send messages on your behalf, increasing the chances of spoofing attacks. Implementing SPF and DKIM allows receiving servers to validate the sender and confirm that the message has not been altered, significantly reducing phishing risks.
Improves Email Deliverability and DMARC Compliance
Major mailbox providers such as Gmail and Microsoft require proper authentication to determine whether an email should be delivered, quarantined, or rejected. SPF verifies authorized sending sources, while DKIM confirms message integrity. Together, they help your NetSuite emails pass DMARC checks, improving inbox placement, protecting brand reputation, and ensuring important transactional or customer communications are reliably delivered.
Common Email Delivery Problems in NetSuite
Most problems are due to authentication misconfigurations, domain reputation issues, or incorrect DNS records. Understanding the following root cause helps administrators quickly fix the issue and restore reliable email delivery:
Emails Going to Spam or Not Delivered
One of the most common issues is emails landing in spam folders or not reaching recipients at all. This usually happens when SPF, DKIM, or DMARC authentication is missing, incorrectly configured, or misaligned with the sending domain. If the NetSuite SPF record does not properly authorize all sending services, mailbox providers may treat messages as suspicious, especially when large volumes are sent. Incomplete authentication, inconsistent sending patterns, or unverified sending sources can also trigger spam filtering, reducing inbox placement significantly.
Failed Authentication Errors Explained
Authentication failures occur when receiving mail servers cannot verify that NetSuite is authorized to send emails for your domain. This may happen if the SPF record does not include the correct sending sources, the DKIM selector is missing or incorrect, or the DKIM NetSuite configuration has not been fully published in DNS. When authentication fails, emails may be rejected outright or marked as suspicious. Monitoring authentication reports and regularly validating DNS records helps identify and resolve these issues before they impact critical business communications.
The process of configuring SPF
To establish SPF authentication for NetSuite, it’s important to note that NetSuite encompasses two distinct services: Email Infrastructure and Tax Infrastructure.
For further details regarding SPF configuration for these services, kindly refer to the table provided below:
For further details regarding SPF configuration for these services, kindly refer to the table provided below:
| Infrastructure Name | SPF Value |
| Tax | include:sent-via.netsuite.com |
| include:mailsenders.netsuite.com |
- Login and head to your DNS Zone provider
- Create a new TXT record
- Input the DNS name as @ or your domain name
- Input the DNS value as v=spf1 include:mailsenders.netsuite.com ~all
Note: Based on the infrastructure you use, please make sure to include the correct SPF Value.
- Save the record
- Wait up to 72 hours to allow your DNS to process the changes
The screenshot below will show you an example of the SPF record. We’ll be using CloudFlare for this example.

Important Note: Each domain must have only one SPF TXT Record. If you have multiple SPF Records, SPF will return a PermError.
If you are using multiple IPs, ESPs, Third-Party services for your various email strategies, you should include them in a single SPF Record.
E.g v=spf1 ip4:18.57.156.221 include:sent-via.netsuite.com include:thirdpartyservice.com ~all
The process of configuring DKIM
In order to authenticate NetSuite on DKIM, please follow these steps
- Go to Setup > Company > Email > Email Preferences.
- Click on the Domain Keys.
- In the Domain Selector field, enter the first domain selector.
- In the Domain Name field, enter your domain name
- Click Generate Key Pairs to generate the DKIM keys
- Click Generated DNS Entry
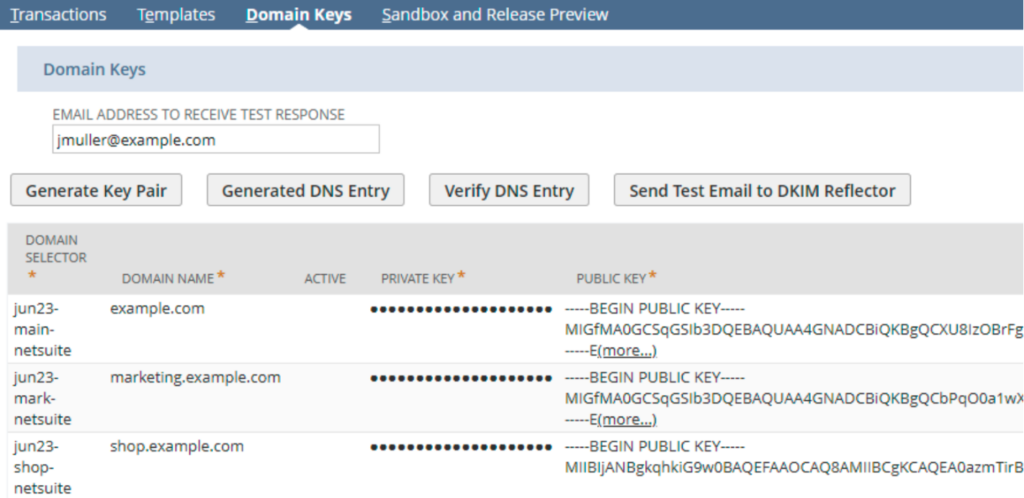
7. Head to your DNS zone
8.Create a new TXT record
9.Input the data based on the format below with your generated keys: Name: [selector]._domainkey
Note: Enter the Domain Selector name you entered in NetSuite with the ._domainkey suffix as the DNS record. For example, if you entered dec2023-netsuite in the Domain Selector field in NetSuite, at your domain provider, you would enter dec2023-netsuite._domainkey
Value: Paste the value you have generated after clicking the Generated DNS Entry and save the record.
Note: Please repeat the process in case you have another DKIM keys generated from the section 8 to 10.
The screenshot below will show you an example of the DKIM record. We’ll be using CloudFlare for this example.

In order to check and verify your DKIM keys, please follow these steps:
- Head to your NetSuite dashboard
- Head to Setup > Company > Email > Email Preferences
- Click on Domain Keys and click on a row to edit the selector for the domain or subdomain.
- Click on Active
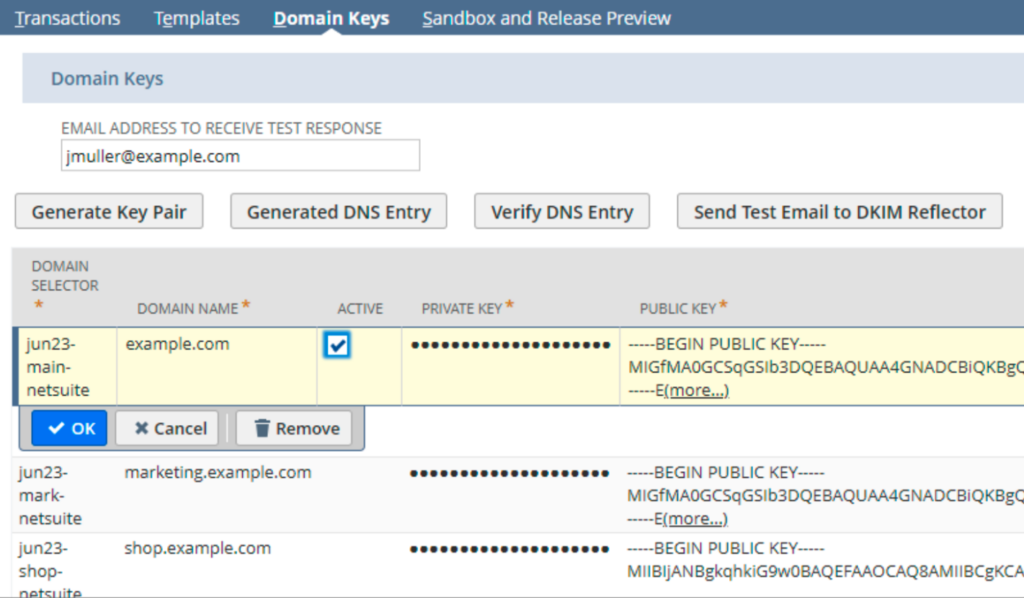
5.Click on Save
6.Click on Verify DNS Entry and make sure your DNS Entry for DKIM is verified
Congratulations, you now successfully authenticated your outgoing mail stream from NetSuite with SPF and DKIM.
Important note: If the provider recommends publishing also a DMARC record, there’s no need to do so if you already have a DMARC record in place, as each domain can only have one DMARC record.
How to Verify SPF and DKIM for NetSuite?
Verifying authentication records ensures your NetSuite emails are properly validated by receiving mail servers. Start by checking whether your domain’s SPF record includes all authorized NetSuite sending sources and confirms a “pass” result. Next, verify that DKIM signatures are correctly published and signing outgoing emails using the expected selector.
Tools from EasyDMARC make this process simple; our SPF Lookup tool instantly confirms whether your record is valid, while the DKIM Lookup tool checks selector availability and key configuration. Running both checks regularly helps detect missing entries, syntax errors, or propagation issues before they impact deliverability.
If managing authentication records manually feels complex, you can start a 14-day free trial with EasyDMARC to automatically monitor, validate, and manage your SPF and DKIM configurations with guided setup and continuous alerts.
Frequently Asked Questions
Yes, NetSuite can work with third-party email providers such as marketing platforms, SMTP relays, or notification services. However, you must update your SPF and DKIM records to authorize these providers; otherwise, emails sent through them may fail authentication checks.
Yes, NetSuite can send automated emails for workflows such as invoices, order confirmations, payment reminders, customer notifications, and marketing communications. These emails are triggered by system events, scheduled campaigns, or workflow automation rules configured within your NetSuite environment.

 We’re glad you joined EasyDMARC newsletter! Get ready for valuable email security knowledge every week.
 You’re already subscribed to EasyDMARC newsletter. Continue learning more about email security with us


