


An Autotask SPF record defines which mail servers are allowed to send emails on behalf of your domain, while the Autotask DKIM setup adds a cryptographic signature to those outgoing emails. This signature allows receiving mail servers to verify that the message has not been altered in transit and that it genuinely originated from an authorized source.
Together, SPFand DKIMhelp ISPs trust your Autotask emails. When configured correctly, they improve deliverability, reduce spam filtering issues, and strengthen your domain’s overall email security posture.
This guide walks you through the setup step by step so your Autotask emails pass DMARC alignmentchecks and reach inboxes instead of landing in spam. Proper email authentication also helps prevent attackers from spoofing your domain and misusing Autotask email addresses for phishing or impersonation.
What Is Autotask Email Authentication
Autotask sends a wide range of automated emails on behalf of your organization, including ticket notifications, workflow alerts, billing updates, and system messages. These emails are often business-critical and time-sensitive, which means they must reach users reliably and be trusted by receiving mail servers. Without proper authentication, these messages can be flagged as suspicious or blocked altogether.
Email authenticationfor Autotask is the process of proving that these automated emails are legitimately authorized to use your domain. It allows mailbox providers like Microsoft and Google to verify that Autotask is a valid sender and not an impersonator attempting to abuse your domain name. This is especially important because attackers commonly target service platforms to send convincing phishing or spoofed emails.
By authenticating Autotask emails, you reduce the risk of delivery failures, protect your domain’s reputation, and ensure recipients can trust messages related to tickets, invoices, and account activity.
Why SPF and DKIM Are Important for Autotask Emails
Since Autotask operates as a third-party platform that sends emails using your domain identity, some trust gaps are created. Here is how SPF and DKIM bridge these gaps:
Improved Email Deliverability for Autotask Messages
A correctly configured Autotask SPF record tells receiving servers that this platform is allowed to send emails on your domain’s behalf. When this check passes, your emails are less likely to be blocked or marked as spam. This is especially important for automated alerts that need to reach users in real time.
Protection Against Domain Spoofing and Impersonation
Attackers often spoof Autotask-style emails by forging the ‘From’ address while sending messages from unauthorized servers. SPF allows receiving mail servers to verify whether the sending IP is approved to use your domain, causing unauthorized messages to fail authentication.
DKIM adds another safeguard by digitally signing emails, making it easy to detect altered or impersonated messages. Together, SPF and DKIM help mailbox providers reliably identify and block forged Autotask emails before they reach users.
Supporting DMARC Alignment and Policy Enforcement
SPF and DKIM provide DMARCwith the information it needs to determine whether an email is authorized to use your domain. For Autotask emails, either the SPF check must match the ‘From’ domain or the DKIM signaturemust use the same domain. When this alignment is correct, mail servers can safely block or filter fake messages without affecting legitimate Autotask emails.
The Process of Setting up the SPF Record
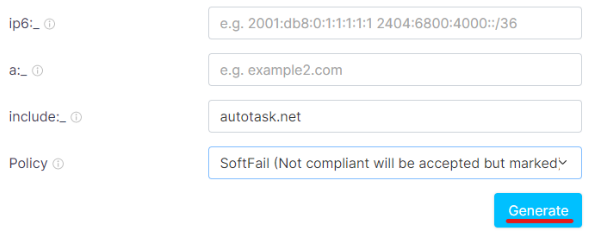
Start by opening the SPF Record Generator, which helps you safely build or update your SPF record without syntax errors.
- In the generator, add ‘include:mail.autotask.net’ under the ‘include’ section. This authorizes Autotask’s mail servers to send emails on behalf of your domain.
- Choose an SPF policy:
- Fail (-all): Emails that fail SPF are rejected (strictest option).
- SoftFail (~all): Emails are accepted but marked as suspicious.
- Neutral (?all): No clear instruction is given to receiving servers, and it is generally not recommended.
- Click ‘Generate’ to create your SPF record.
4. Next, copy the generated SPF record and log in to your DNS provider (such as Cloudflare or GoDaddy). Create or update a TXT record for your domain and paste the SPF value.
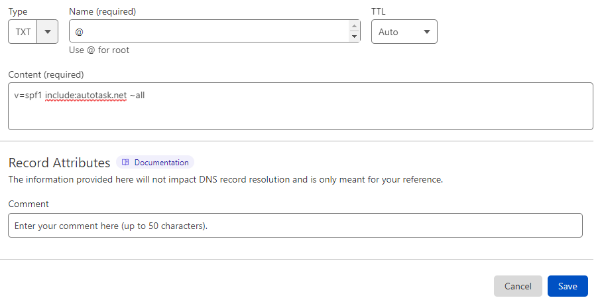
5. Save the changes and allow up to 72 hours for DNS propagation.
Important note: Each domain must have only one SPF TXT record. Run your Autotask SPF record through our SPF Lookup tool to see if multiple of them exist. If they do, receiving servers will return a PermError, which will cause SPF checks to fail. If you use multiple email services or third-party senders, all of them must be included in a single SPF record, for example:
v=spf1 ip4:17.67.137.221 include:mail.autotask.net include:thirdpartyservice.com ~all
Autotask DKIM Configuration
Follow these steps to set up DKIM for Autotask:
1. Start by logging in to your Autotask account and navigating to Domain Settings > Authentication Details. Autotask generates a DKIM record for each sending domain and uses a CNAME-based DKIM setup, which means the cryptographic keys are managed by Autotask.
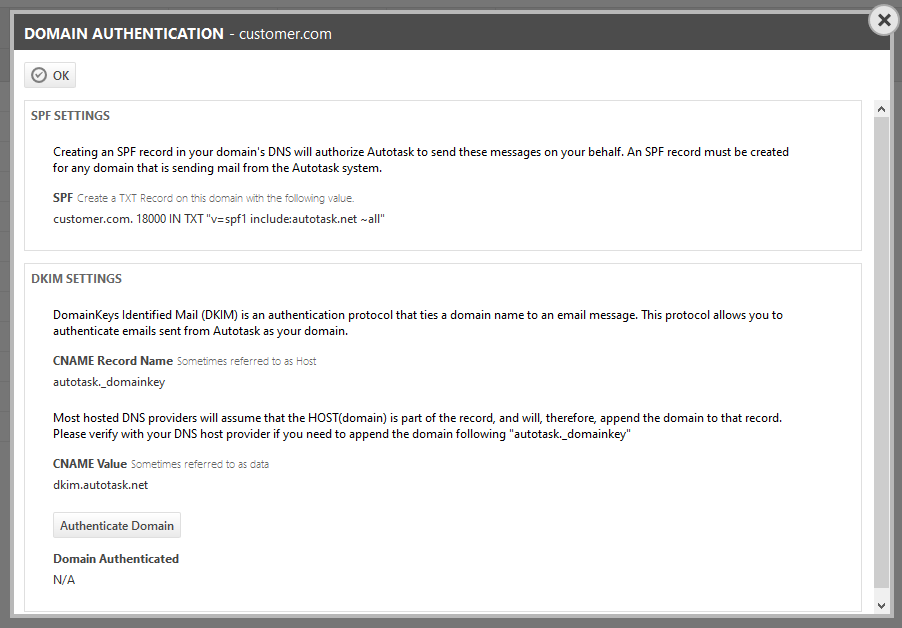
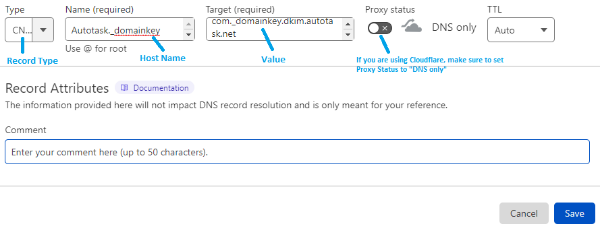
2. Review your DKIM CNAME record. It should include the following details:
- Type: CNAME
- Host: autotask._domainkey
- Value: autotask-yourdomain-com._domainkey.dkim.autotask.net (This value is unique for each domain.)
Before publishing the record, you can use the EasyDMARC DKIM Record Checker to confirm the correct DKIM structure and avoid formatting errors.
3. Next, copy the CNAME host and value and add them to your DNS provider.
4. Save the record and allow time for DNS propagation.
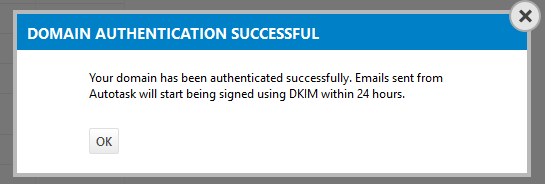
Once the DNS entry is live, return to Autotask and click Authenticate Domain. Autotask will check whether the DKIM record is publicly visible and correctly configured. If authentication succeeds, a confirmation message will appear.
If the authentication fails, Autotask will display an error banner indicating what needs to be fixed.

5. Close the dialog.
Important note: If the provider recommends publishing a DMARC record, there’s no need to do so if you already have a DMARC record in place. This is because each domain can have only one DMARC record, and duplicating it may break DMARC enforcement.
Common Autotask SPF Record and DKIM Setup Issues
Here are the general problems triggered after configuring SPF and DKIM for Autotask emails:
- Multiple SPF Records
Some domains publish multiple SPF TXT records, often when Autotask is added separately from existing email services. This causes an SPF PermError, and receiving mail servers may skip SPF evaluation entirely.
To avoid this issue, merge Autotask and all other sending services into a single SPF entry using multiple ‘include’ statements.
- Exceeding the DNS Lookup Limit
SPF allows a maximum of 10 DNS lookups during evaluation. Domains that use several email providers, marketing platforms, and third-party services may exceed this limit once Autotask is added, causing SPF to fail.
The solution is to audit your SPF record and reduce unnecessary ‘include’ entries. Where possible, flatten the SPF record or remove unused services to stay within the DNS lookup limit.
- Incorrect or Missing CNAME Record
Autotask DKIM authentication fails when the CNAME record contains typos, incorrect hostnames, or invalid values. So, always double-check that the CNAME host and value exactly match what Autotask provides.
- DKIM Authentication Fails After Publishing
Autotask may try to verify the domain before the DNS changes have fully updated, which can cause temporary authentication errors. You can avoid this potential issue by giving sufficient time for DNS propagation and retrying authentication from the Autotask portal. We suggest not repeating edits during propagation, as this may delay validation.
Secure and Authenticate Autotask Emails the Right Way
Before enforcing a stricterDMARC policy, always verify that your SPF and DKIM records are accurate, complete, and within technical limits. Regular checks help catch misconfigurations early and prevent unexpected delivery problems.
To simplify this process, you can use EasyDMARC’s tools to generate, test, and monitor your email authentication records. Start with the EasyDMARC 14-day free trial to validate your setup, monitor authentication results, and ensure your Autotask emails stay secure and trusted.
Frequently Asked Questions
If the SPF record exceeds the 10 DNS lookup limit, SPF checks fail with a PermError, which can cause Autotask emails to be rejected or flagged as spam.
Yes. When you change email providers, you must update your SPF record to authorize the new sender, or legitimate emails may fail authentication and delivery.