


DomainKeys Identified Mail (DKIM) is an email authentication method that protects email senders and recipients from spam, spoofing, and phishing. It uses “public key cryptography” to verify that an email message was sent from an authorized mail server for a particular domain and hasn’t been tampered with during transit. OpenDKIM is an open-source implementation of the DKIM sender authentication system. It integrates into Postfix or Sendmail, the two most common Mail Transfer Agents (MTAs).
Configuring OpenDKIM with Postfix can seem daunting, particularly for those unfamiliar with the process. However, with the right approach, you can accomplish it relatively quickly. This guide will walk you through the process.
Why Is DKIM Important for Postfix Servers?
While navigating the intricate world of email servers, you may have stumbled upon DomainKeys Identified Mail (DKIM). But why is it so crucial, particularly for Postfix servers?
DKIM provides a method of validating a domain name identity associated with a message through cryptographic authentication. This process aids in combating email spoofing, thereby enhancing email security. In the context of Postfix servers, integrating DKIM has several distinctive benefits:
- Improved Email Deliverability: Improved Email Deliverability: Emails signed with DKIM are less likely to be flagged as spam, ensuring your messages reach the intended recipients. You can confirm inbox placement accuracy by running an email deliverability test after configuration.
- Enhanced Sender Reputation: It boosts your domain’s credibility and reputation by demonstrating that your emails are legitimate and tamper-proof.
- Increased Trust: It verifies the sender’s identity, reassuring recipients that the emails they receive are authentic.
Implementing DKIM in conjunction with Postfix helps increase the reliability and integrity of your email communications, contributing to a safer, more secure digital environment.
Understanding the Basics of OpenDKIM
There are three main components in the OpenDKIM configuration:
- Signing: Adding a private key signature to outgoing emails.
- Verifying: On the receiving end, the public key – located in the sender’s DNS records – is used to verify the email signature authenticity.
- Key generation: Generating the private and public keys used in signing and verifying.
Quit Tinkering With Technical Configurations Manually
EasyDMARC’s Cloud-Native Platform Makes DKIM Easy!
It’s also essential to understand the main factors that contribute to the overall effectiveness of the OpenDKIM setup:
- Domain reputation
- Consistent configuration
- The quality of email content
Let’s look closer at configuring OpenDKIM with Postfix, one of the most popular mail transfer agents.
Checking the Prerequisites for Installing OpenDKIM
To ensure a smooth and successful configuration of DKIM with Postfix, it is paramount to first address the following prerequisites:
- Administrative Access: You should have superuser (root) access or an account with sudo privilege on your mail server. This is crucial for installing packages and making necessary configuration changes.
- Installed Postfix: Postfix must already be installed and properly configured on your server.
- Domain Name: A fully qualified domain name (FQDN) is required.
- OpenDKIM Package: The OpenDKIM package must be installed on your server.
Once you fulfill these prerequisites, you can start configuring DKIM with Postfix.
5 Steps to Full OpenDKIM Configuration With Postfix
DKIM is a vital authentication method used to verify the DNS domain of an email sender and the message integrity. Every server administrator and website owner must set up DKIM to protect their server from phishing scams and to improve email deliverability. OpenDKIM configuration with Postfix can seem complex, but it’s easy if you follow the proper steps.
This section provides a comprehensive, step-by-step guide to configure OpenDKIM with Postfix effectively.
Step 1. Installing OpenDKIM on Your Postfix Server
- Start with installation:
sudo yum install opendkim Step 2: Configure OpenDKIM
- Edit OpenDKIM main configuration file
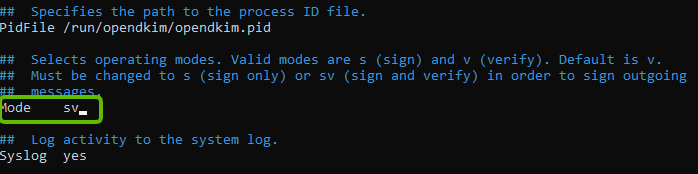
sudo nano /etc/opendkim.conf- Find the “Mode v” line, and change it to “Mode sv”. By default, OpenDKIM is set to verification mode (v), which verifies the DKIM signatures of receiving email messages. Changing the mode to “sv,” will let us activate the signing mode for outgoing emails.
- In the same OpenDKIM Configuration file, find the following lines and remove the Comment (#)
KeyFile
KeyTable
SigningTable
ExternalIgnoreList
InternalHosts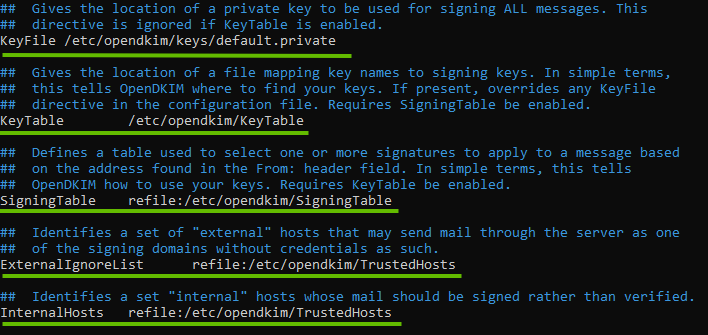
- At the end of this file, add the following commands on separate lines:
Domain yourdomain.com
RequireSafeKeys True
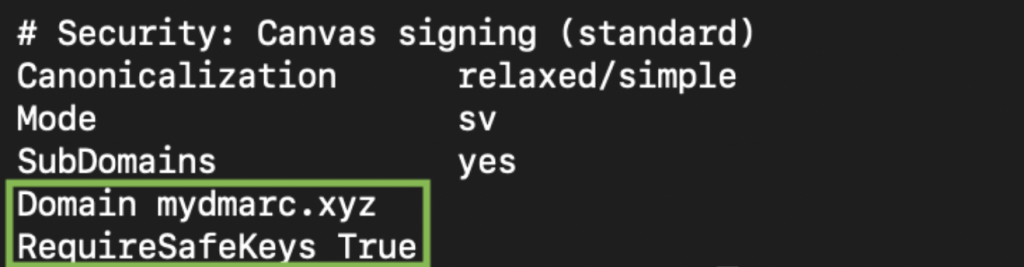
Because we set RequireSafeKeys to True, OpenDKIM will refuse to sign emails if your private key is “world-readable” or owned by the wrong user. You must run these commands on your server to satisfy the security check:
1. Set the Owner: The opendkim service user must own the key file.
sudo chown opendkim:opendkim /etc/opendkim/keys/default.private
2. Restrict Permissions: Set the key to 600 so that only the opendkim user can read it.
sudo chmod 600 /etc/opendkim/keys/default.private
3. Restart the Service: Apply the changes by restarting OpenDKIM.
sudo systemctl restart opendkim
- Edit the signing table file:
sudo nano /etc/opendkim/SigningTable- Add the following line at the end of this file:
*@yourdomain.com yourselector._domainkey.yourdomain.comThis tells OpenDKIM that if a sender on your server is using any @yourdomain.com address (in this example, *@easydmarc.me), then it should be signed with the key identified by default._domainkey.yourdomain.com (in this example, default._domainkey.easydmarc.me)
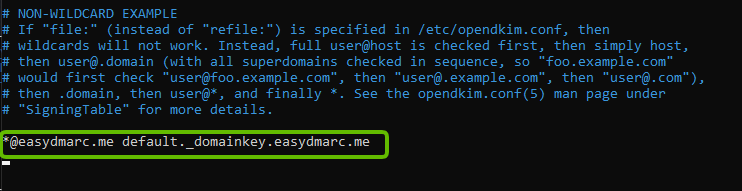
Note: “default” is the DKIM selector. A domain might have multiple DKIM Signatures. The DKIM selector allows you to choose a particular DKIM Key. You can use any name of your choice, but make sure you don’t have a DKIM Signature already implemented with the same selector name.
- Save and close the OpenDKIM main configuration file
- Edit the KeyTable file
sudo nano /etc/opendkim/KeyTable- Add the following line:
yourselector._domainkey.yourdomain.com yourdomain.com:yourselector:/etc/opendkim/keys/yourdomain.com/default.private
This line specifies the location of the DKIM private key. In this screenshot, the selector is the “default”.
In this screenshot, selector is defined as default

- Save and close the file
- Edit the OpenDKIM Trusted Hosts file
sudo nano /etc/opendkim/TrustedHosts
127.0.0.0.1 and ::1 are included in this file by default.
Add the following line
*.yourdomain.com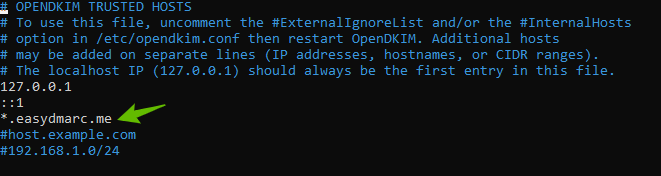
Step 3: Generate Private/Public Keys
- Create a new directory for your domain
sudo mkdir /etc/opendkim/keys/yourdomain.com
- Generate keys using opendkim-genkey tool
sudo opendkim-genkey -b 1024 -d yourdomain.com -D /etc/opendkim/keys/yourdomain.com -s yourselector -v
- Make opendkim the key owner
sudo chown opendkim:opendkim /etc/opendkim/keys -R Step 4: Publish the created public key in your DNS
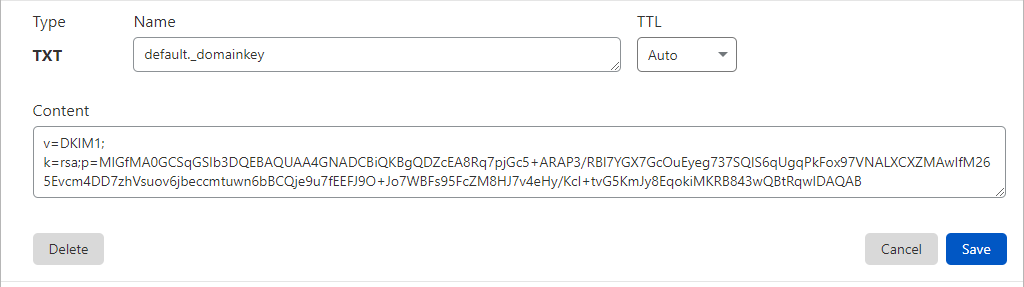
- Get and display the Public Key
sudo cat /etc/opendkim/keys/yourdomain.com/default.txt
- Implement it in your DNS (In this example, Cloudflare).
Important Notes:
Name/Target: yourselector._domainkey
Content: Value you’ve copied in the previous stage. Make sure to remove any spaces or double-quotes.
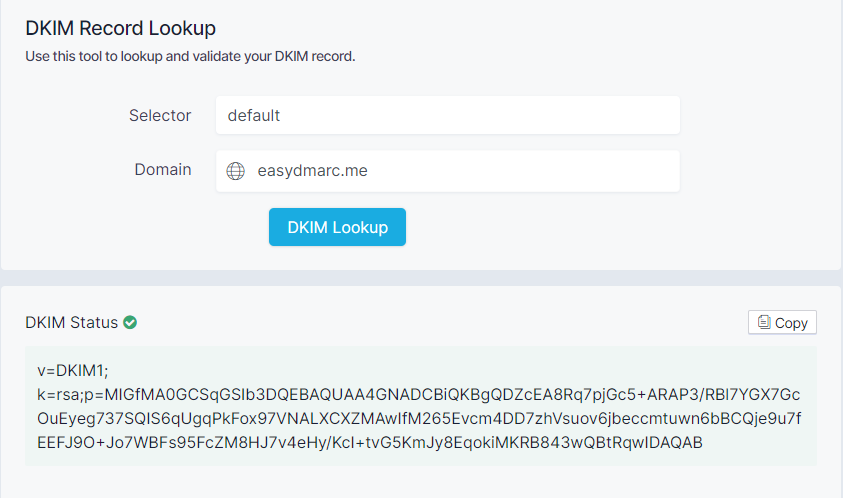
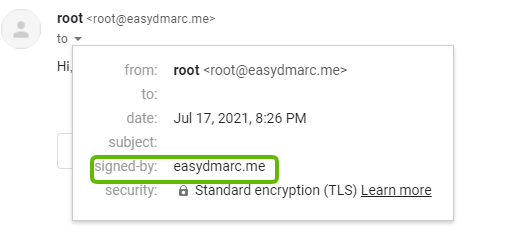
- After publishing DKIM Public key in your DNS, confirm DKIM is valid using EasyDMARC DKIM Lookup tool.
Step 5: Connect Postfix to OpenDKIM
Now that you’ve configured OpenDKIM, it’s time to implement Postfix DKIM. Let’s follow the Postfix OpenDKIM configuration process.
- Edit Postfix main configuration file
sudo nano /etc/postfix/main.cf- Add the following lines at the end of the “main.cf” file
smtpd_milters = inet:127.0.0.1:8891 non_smtpd_milters = $smtpd_miltersmilter_default_action = accept
This will let Postfix call OpenDKIM via the milter protocol.
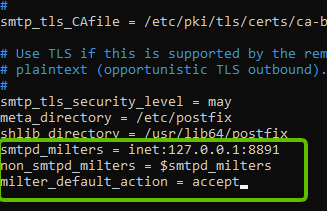
- Save and close the file.
- Restart OpenDKIM and Postfix
sudo service opendkim restartsudo service postfix restartStep 6: Test Your DKIM Configuration
- Send a test email from your server to confirm that Postfix DKIM is working.
Now, you’ve configured OpenDKIM on Postfix.
Troubleshooting DKIM With OpenDKIM and Postfix
| Issue | Solution |
| Incorrect DNS records DKIM relies on DNS records to verify the authenticity of emails, so the verification process will fail if the records are incorrect or missing. | Double-check the DNS records and ensure their correct configuration. You can use EasyDMARC’s domain health checker to find and solve DNS issues. |
| Incorrect OpenDKIM configuration This can happen if the configuration file contains errors or if the settings are not properly configured. | Check the configuration file and make sure all settings are correct. You can also use the opendkim-testkey command to test the configuration and verify that it is working properly. |
| Postfix configuration errors Postfix misconfigurations may lead to email signature verification failures. | Check the Postfix configuration file and make sure all settings are correct. You can also use the Postfix mailq command to check the mail queue to find issues with sending or receiving emails. |
| Issues with firewalls or network settings If the firewall is blocking DKIM traffic or the network settings contain misconfigurations, DKIM may not work as expected. | Check the firewall settings and make sure DKIM traffic is allowed. You can also check the network settings and ensure they are correct. |
Best Practices for Implementing DKIM With OpenDKIM and Postfix
Understanding the best practices for implementing DKIM with OpenDKIM and Postfix is crucial for ensuring secure and efficient email delivery. Here, we delve into the top strategies to help streamline this process.
- Choose a Strong Selector:
Selectors are integral to DKIM implementation. Choosing a robust and unique selector reduces the chances of email spoofing and improves email deliverability.
- Generate Secure Keys:
Employ RSA keys with a minimum length of 2048 bits for DKIM signatures. This increases the security of your emails and mitigates risks associated with key compromises.
- Regularly Rotate Keys:
Regularly rotating your DKIM keys is a good security practice. It limits the amount of time malicious actors can use a compromised key.
- Monitor Email Delivery:
Monitor your email delivery rates and bounce rates closely. This helps you identify potential issues with your DKIM configuration and rectify them before they impact your email deliverability.
Note: Implementing DKIM is a technical process that requires a solid understanding of email servers and security protocols. We recommend you consult with an IT professional or conduct thorough research before proceeding.
Get the Most out of Email Authentication Best Practices
Start Your DKIM Journey Now!
Conclusion
Setting up DKIM with OpenDKIM and Postfix might seem intimidating initially, but it follows a systematic approach. This article has taken you through the step-by-step process, clarifying complex concepts and offering technical guidance.
Remember, proper configuration of DKIM is crucial for email security, ensuring that the emails you send are not flagged as spam or malicious.

You may have errors here, line are not split.
smtpd_milters = inet:127.0.0.1:8891
non_smtpd_milters = $smtpd_milters
milter_default_action = accept
Also error in folder name. You’re generating cypher in a folder under the ‘keys’ folder, and you’re not going with that path in opendkim.conf.
Hi Sekula, thanks for your input!
We’ve already fixed the first point. Can you provide more information regarding the ‘error’ in the folder name?
True – for the folder error reference, in your instructions about uncommenting lines in opendkim.conf, (1) the reference to Keyfile should be KeyFile with cap F and (2) once uncommented, the value should be modified to /etc/opendkim/keys/yourdomain.com/default.private instead of what the file already has (/etc/opendkim/keys/default.private). That said, opendkim.conf comments that the KeyFile value is ignored if KeyTable is given, which it is, so maybe no harm done in this case even with the errant value.
Hi Stan,
Thank you for providing detailed input.
We have addressed the issue with the KeyFile and will review the steps you mentioned to determine if any further updates are necessary.
Cheers,
Hagop
I have a mail server hosting multiple domains. All of them use mail.mydomain.tld as their MX server in DNS. Do I need to set up an OpenDKIM record for mailmydomain.tld and then add that record to the zone file for each domain, or do I need to create different keys for each domain?
Hi Thomas,
You need to create a separate key pair and set up a KeyTable with a separate line for each selector, domain & keyfile.
Technically, it would look like this:
selector._domainkey.firstdomain.com firstdomain.com:selector:/etc/opendkim/keys/firstdomain.com/selector.private
selector._domainkey.seconddomain.com seconddomain.com:selector:/etc/opendkim/keys/seconddomain.com/selector.private
Additionally, you need to update your SigningTable to determine who can sign on each domain:
*@firstdomain.com selector._domainkey.firstdomain.com
*@seconddomain.com selector._domainkey.seconddomain.com
sudo: opendkim-genkey: command not found, i tried to install the opendkim-genkey also not found, how to fix it?
Did you follow all the steps?
If you’ve installed opendkim successfully, then opendkim-genkey will automatically work.
Same issue
Solved with install opendkim-tools
dnf install opendkim-tools
This is great article, works like a charm.
You are missing in the opendkim config that, by default, depending on distribution, it is listening on a local socket, not on localhost 8891 so the localhost:8891 socket needs to be enabled too. I execute it on a Rocky Linux.
You`ve right – I need to write or uncoment a line:
Socket inet:[email protected]
In AlmaLinux 9.1
Hi mate,
Great instructions and easy to follow
Hi, by adding lines smtpd_milters = inet:127.0.0.1:8891, are we forcing postfix to use DKIM configuration for all domains?
if there are multiple domains and only one of the domain we want to use signing keys then adding smtpd_milters in postfix configuration will imapct/break other domains?
Hi,
To address your concern, you can configure the “SigningTable” in OpenDKIM to include only the domain(s) you want to sign. This will ensure that only those specific domains are signed by DKIM, while others remain unaffected.
Let me know if this resolves your issue!
In the KeyTable explanation, I think that “selector” shoud be replaced by “yourselector” :
youselector._domainkey.yourdomain.com yourdomain.com:yourselector:/etc/opendkim/keys/yourdomain.com/default.private
Alain, thanks for pointing that out! Just made the changes!
TOP !