


A DMARC record can help improve your reputation by ensuring emails that come from your domain are authentic. It provides a set of protocols that aim to improve email delivery and prevent spoofing and phishing attacks. What is DMARC? DMARC helps provide guidelines for what to do with email messages that do not align with policies published in your DNS. You must first ensure that SPF and DKIM policies are in place and working correctly. Any mistakes can result in problems with email delivery and increased phishing attacks. We’ll show you how to create DMARC record in DNS with the DMARC record generator on EasyDMARC.
What is a DMARC Record?
It is a TXT record that can be published in your DNS to determine what happens when a message fails to meet certain criteria. In other words, if the receiving server cannot verify that the incoming email is from who it says it’s from, then it will fail a DMARC check.
DMARC records help servers communicate with each other and verify their authenticity. It allows an incoming server to either reject the message, quarantine it (send it to spam), or allow it to go through. A published DMARC record can also send reports to an authorized user with information and data pertaining to which messages are being rejected and which are going through.
These benefits have a major impact on your email delivery and reputation. Without DMARC, cybercriminals can reach your contacts by pretending to be you.
Once published, a DMARC record can be used to tell an incoming server what to do if any suspicious activity is detected. If a domain does not have a published DMARC record, then the receiving server will have to determine on its own what to do with potentially malicious messages.
Example of a Published DMARC Record
A DMARC record is made up of a host name and a tag-value pair. A host name refers to the name of the email domain. The tag-value pair is a tag represented by “p=” and the value, which may include “none.” These two components are paired together to tell a receiving mail server what to do with the message. The following example contains three tag-value pairs:
v=DMARC1; p=none; rua=mailto:[email protected]
In the above example, the three tags are: “v,” “p,” and “rua.” The three values are “DMARC1” “none” and “mailto:[email protected]” The “v” tag refers to the version of DMARC you are using, the “p” refers to the policy type (what you want the receiving email message to do if it fails a DMARC check), and the “rua” refers to the email address that DMARC reports need to be sent to.
For more information on how to publish DMARC on EasyDMARC, refer to the article available on our website.
How To Create DMARC Record In DNS With EasyDMARC Generator Tool
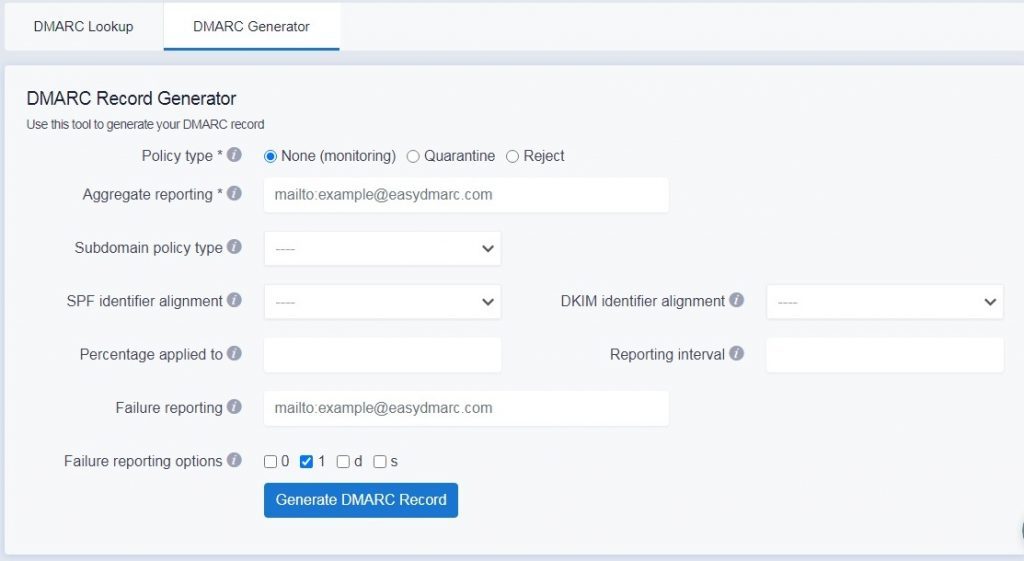
You can use the DMARC record generator on the EasyDMARC website to create a DMARC record for free by following these easy steps:
- Go to the EasyDMARC free record generator page here
- Click on the button that says “DMARC generator” on the right
- Enter your policy type (you can choose from “none,” “quarantine,” and “reject”)
- Choose your aggregate reporting (for example: mailto:[email protected])
- Also, choose your subdomain policy type (your options are none or monitoring, quarantine, and reject)
- Then choose your SPF identifier alignment (either relaxed or strict)
- Choose your DKIM identifier alignment (again, relaxed or strict)
- Pick out the percentage applied to (the percentage of messages from the domain owners main stream to which the DMARC policy is applied to; default is 100)
- Also, choose the reporting interval (the requested interval in seconds between aggregate reports; default is 86400)
- Choose failure reporting (example: mailto:[email protected])
- Pick out failure reporting options: determines the type of reports that are sent out.
DMARC Policy Types
The policy type refers to the policy that needs to be enabled by the receiving domain at the request of the owner. Policy refers to the domains and subdomains unless the subdomain policy states otherwise. Aggregate reporting refers to the email address that you want feedback to be sent to. You can list several email addresses in this section. But they will need to be separated by a comma.
The subdomain policy type refers to the policy that is enacted by the receiving email at the request of the owner of the domain. It applies to subdomains only and not to domains. SPF identifier alignment and DKIM identifier alignment indicates how relaxed or strict you want the DMARC policy to be. The domain owner is required to enable these settings. Default settings always become relaxed. However, you can change this to become strict. You can also have your DMARC failure notices sent to separate email addresses. These will need to be listed and separated with a comma in the failure reporting section.
For a more detailed explanation about DMARC Tags, refer to this article available on our website.
In this example, we’ve generated a DMARC Record with Monitoring mode (p=none), strict SPF and DKIM identifier alignments, and including EasyDMARC addresses in “rua” and “ruf” tags that will allow EasyDMARC to handle the complicated DMARC XML files received by parsing them into easy and human-digestible data that can be seen and observed in your account’s dashboard.
An EasyDMARC account is easy to use and can help manage your DMARC reports for you. You can sign up for alerts to get notified when something needs your attention. You can also utilize the IP/domain reputation checker to see where you fall in terms of blacklists. This can help improve your email delivery and protect sensitive data for both you and your clients. The Domain Scanner can also check how vulnerable your domain is for phishing attacks. Simply sign in to your dashboard and check out all the ways EasyDMARC protects your domain and takes the guesswork out of confusing DMARC policies.
How To Avoid “No DMARC Record Found” Messages
If you get a “no DMARC record found” message, then you can use the EasyDMARC record generator to make one. If you are generating a DMARC record for the first time, then you will want to set your policy to p=none. This allows DMARC to enable a monitoring mode. It does not affect your email messages in any way.
You will still be able to get DMARC reports and study these to determine which emails are possibly questionable. You can also use the DMARC reports to determine how strict you need your policy to be. First-time DMARC policy holders will also want to send their aggregate reports to a mailbox that they have access to regularly. You can do this by pointing the rua tag to your email address.
How to create DMARC record in DNS: useful tips
After you use the EasyDMARC record generator for free, be sure to double-check your work to prevent error messages. Published DMARC records can be found in your DNS. You will need to log into your DNS dashboard to add the record (if you do it manually). You can also use the free online DMARC checker listed on the EasyDMARC website to do this for you.
Keep in mind that only a DMARC record with a p=reject policy will provide the most protection against hacking, spoofing, and phishing. However, we don’t recommend enabling a p=reject mode unless your DMARC record is professionally handled as this may lead to the rejection of perfectly valid emails if not done properly. This means you could miss out on crucial emails. EasyDMARC can help you troubleshoot if you keep getting an error message that you can’t figure out. Sign in to your account and chat with a professional now.
Conclusion
Creating a DMARC Record (and enforcing DMARC policy to Reject) on your DNS is essential for the ultimate domain protection. Without it, your email will be subject to hacking, spoofing, and phishing attacks. Start DMARC journey with Monitoring mode (p=none), analyze all the outgoing mail streams, authenticate them with SPF & DKIM, and then move towards DMARC-enforced policies (Quarantine and then Reject).
You can manually create a DMARC record on your own. However, this can be very confusing and time-consuming. Using the free DMARC record generator on the EasyDMARC website ensures that your email authentication protocol is properly setup with little effort. The EasyDMARC record generator allows you to control your options by enabling strict or relaxed modes. So you can also enter several emails to send data reports to.